Windows 11 revolutionized the operating system, but some familiar features got a makeover. One common question: how do you move the taskbar to a second monitor? Whether you’re a seasoned multitasker or just setting up a new dual-screen setup, knowing how to customize your taskbar placement is essential for maximizing productivity. This guide will walk you through the built-in methods, plus explore advanced options for those seeking ultimate control.

Understanding the Taskbar in Windows 11: A New Approach
Unlike previous Windows versions where you could simply drag and drop the taskbar, Windows 11 operates differently. The taskbar primarily resides on your designated “main display.” This means moving it requires adjusting system settings. Let’s dive into the step-by-step instructions.
Method 1: Repositioning the Taskbar by Changing Your Main Display
This is the native Windows 11 method for moving the taskbar. It involves designating a different monitor as your “main display,” which will then host the taskbar. Here’s how:
1- Access Display Settings: Press the Win + I keys to swiftly open the Settings app. Navigate to System and then click on Display.
2- Identify Your Monitors: In the display settings, you’ll see visual representations of your connected monitors. If you’re unsure which is which, use the Identify button. Numbers will appear on your screens, helping you distinguish between them.
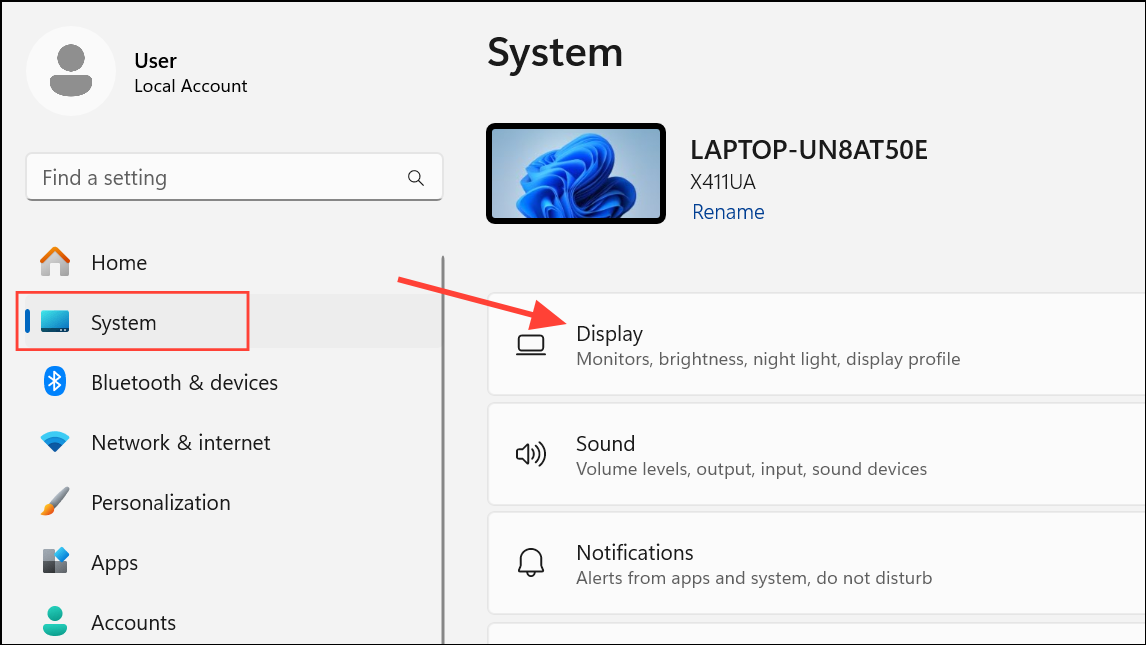
3- Select Your Target Monitor: Click on the monitor where you wish the taskbar to appear. This action is important because the taskbar will move to whatever screen is set as the main display.
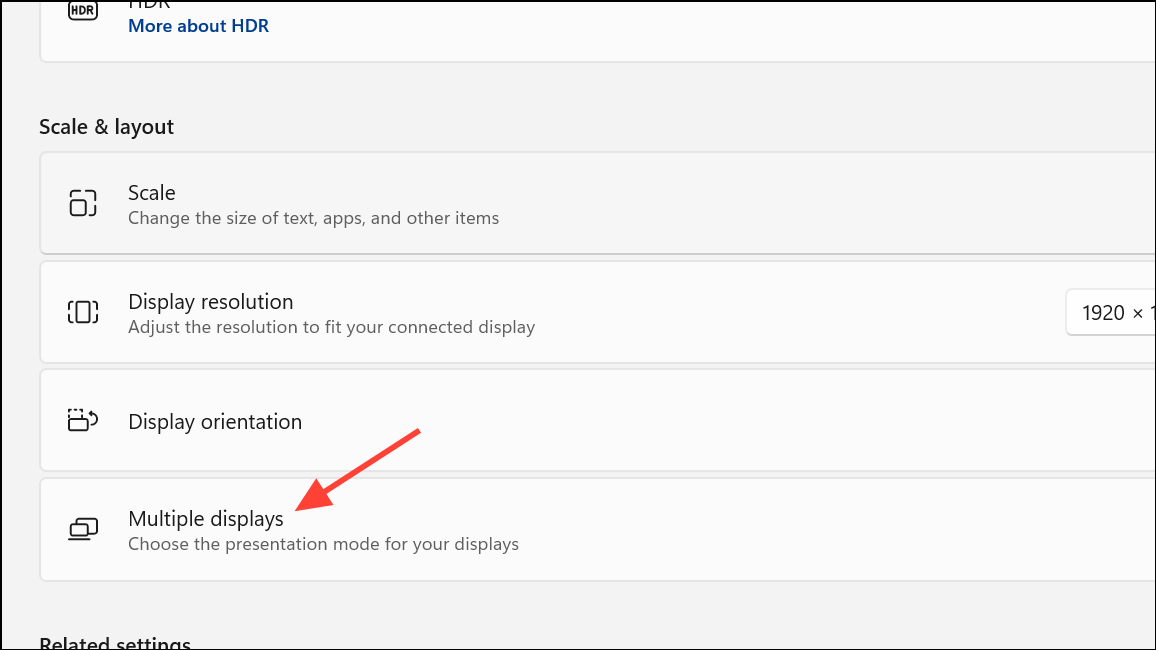
4- Set as Main Display: Scroll down within the settings for the selected monitor and locate the “Multiple displays” section. Check the box that says Make this my main display. Doing so will move the taskbar to that screen. Be aware that this also shifts where new applications and windows open by default.
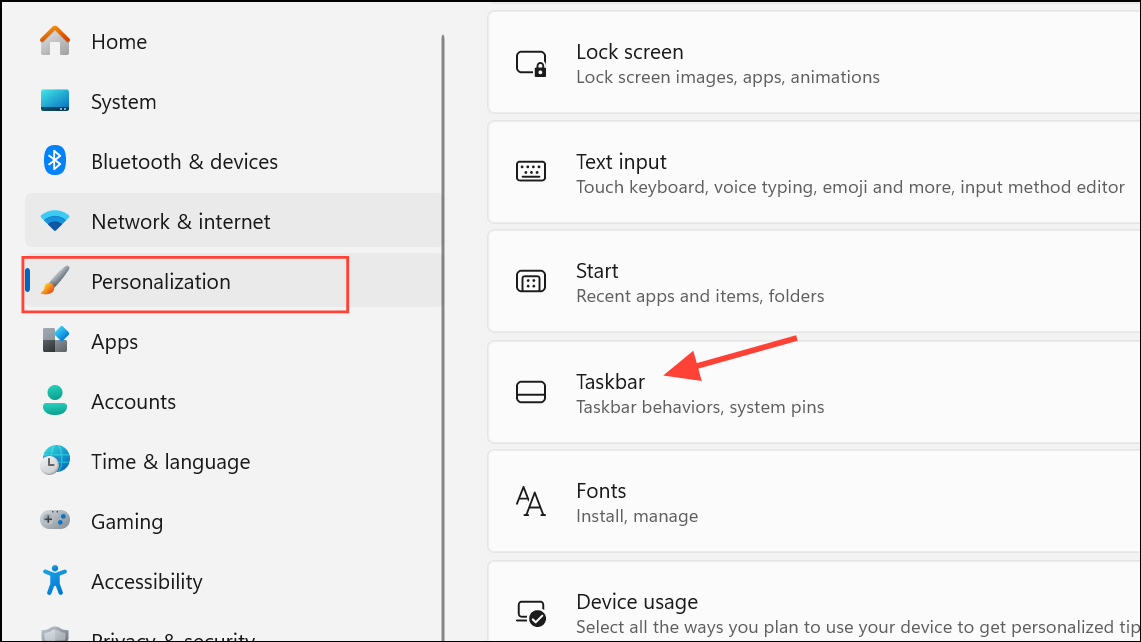
5- Restrict Taskbar Display (Optional): If you only want the taskbar on the new main display, go to Personalization in the left sidebar, then click on Taskbar. Expand the Taskbar behaviors section and make sure the Show my taskbar on all displays option is unchecked.

Important Considerations:
Changing your main display impacts more than just the taskbar. It influences where new applications and games launch, so consider your preferred workflow before making this change.
Method 2: Showing the Taskbar on All Displays for Enhanced Multitasking
If you prefer to see the taskbar on all your monitors, Windows 11 offers a simple setting to achieve this. This approach is ideal for keeping track of open applications and notifications across multiple screens.
1- Navigate to Taskbar Settings: Open Settings using Win + I. Go to Personalization then click on Taskbar.
2- Expand Taskbar Behaviors: Scroll down to the Taskbar behaviors section.
3- Enable Taskbar on All Displays: Check the box next to Show my taskbar on all displays. The taskbar will now appear at the bottom of every monitor. The system tray and notification area will still reside on your primary display.
4- Customize App Icon Display: Adjust how app icons are displayed using the drop-down menu under When using multiple displays, show my taskbar apps on. You can choose to show all app icons on every taskbar, only on the main taskbar and where the window is open, or only on the taskbar where the window is open. Experiment to find the settings that best suits your workflow.
Going Beyond Built-in: Third-Party Tools for Advanced Taskbar Customization
Windows 11’s native options are useful, but they might not fully satisfy everyone’s needs. If you crave more control over taskbar placement and behavior, several third-party applications offer advanced features.
- StartAllBack: This popular utility brings back the classic taskbar functionality, letting you essentially “unlock” the taskbar and drag it to any monitor, just like in Windows 10. After installing StartAllBack, simply right-click the taskbar, unlock it, and drag it to your desired screen. This is a good option if you want to keep your primary display unchanged. StartAllBack is a paid program, but it’s well-regarded for its stability and customization options.
- DisplayFusion Pro: For those needing extremely granular control over multi-monitor setups, DisplayFusion Pro is a powerful option. It offers custom taskbars for each monitor, among other features. While the taskbar isn’t a direct replacement for the Windows system tray, DisplayFusion provides extensive multi-monitor management capabilities.
Important Notes Before Using Third-Party Software:
Before installing any third-party application, consider the following:
- Compatibility: Always ensure the software is compatible with your version of Windows 11.
- Reviews: Research and read reviews to gauge the program’s reliability and user experience.
- System Restore Point: Consider creating a system restore point before installing any third-party software. This allows you to revert your system to its previous state if you encounter any issues.
- Security: Always download software from reputable sources to avoid potential security risks.
Conclusion:
Customizing your taskbar placement is more than just a cosmetic change; it’s about optimizing your workflow and enhancing your productivity. Windows 11 offers both built-in methods and third-party tools to help you achieve the perfect multi-monitor setup. By understanding the available options, you can tailor your Windows 11 experience to fit your specific needs and work habits, ultimately boosting your efficiency and enjoyment.
And if you'd like to go a step further in supporting us, you can treat us to a virtual coffee ☕️. Thank you for your support ❤️!

We do not support or promote any form of piracy, copyright infringement, or illegal use of software, video content, or digital resources.
Any mention of third-party sites, tools, or platforms is purely for informational purposes. It is the responsibility of each reader to comply with the laws in their country, as well as the terms of use of the services mentioned.
We strongly encourage the use of legal, open-source, or official solutions in a responsible manner.
Comments