
Your privacy is paramount. In today’s digital world, understanding and controlling your data, including location information, is more important than ever. Windows 11 offers features like “Find My Device,” which, while useful for locating a lost laptop, can also raise privacy concerns. This guide provides comprehensive instructions on how to disable “Find My Device” on your Windows 11 device, ensuring you have complete control over your location data.
Method 1: Disabling Find My Device Through Windows Settings
This is the most user-friendly method and ideal for most users. It’s a simple process that can be completed in minutes:
1- Open Windows Settings: Press the Windows key + i on your keyboard. This shortcut swiftly opens the Settings application, granting you access to system configurations.
2- Navigate to Privacy & Security: In the Settings window, locate and select “Privacy & security” from the menu on the left-hand side. This section centralizes all privacy-related settings.
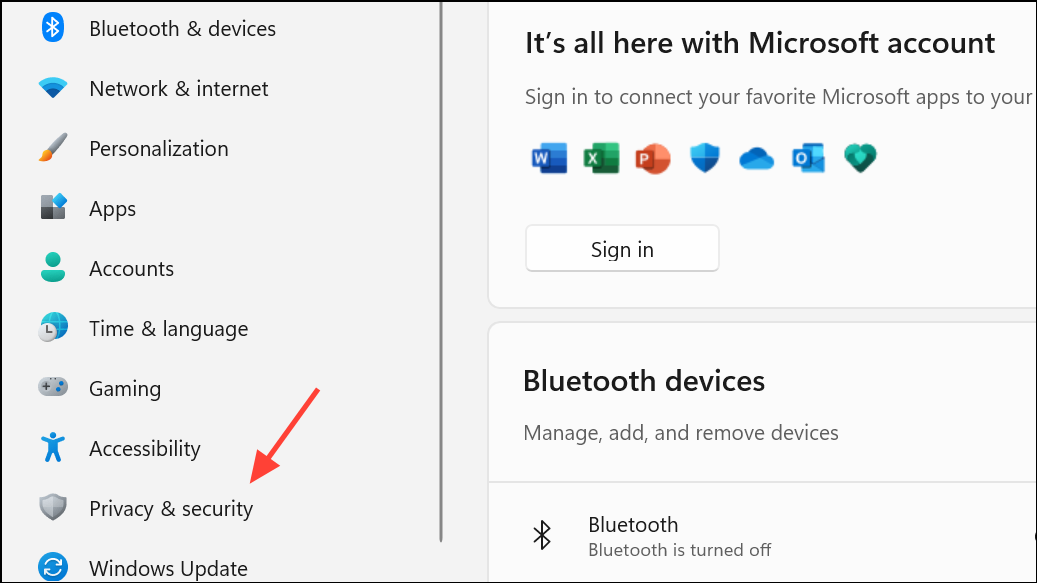
3- Access Find My Device: Within “Privacy & security,” click on “Find My Device.” This area displays the current status of the feature, along with the necessary controls.
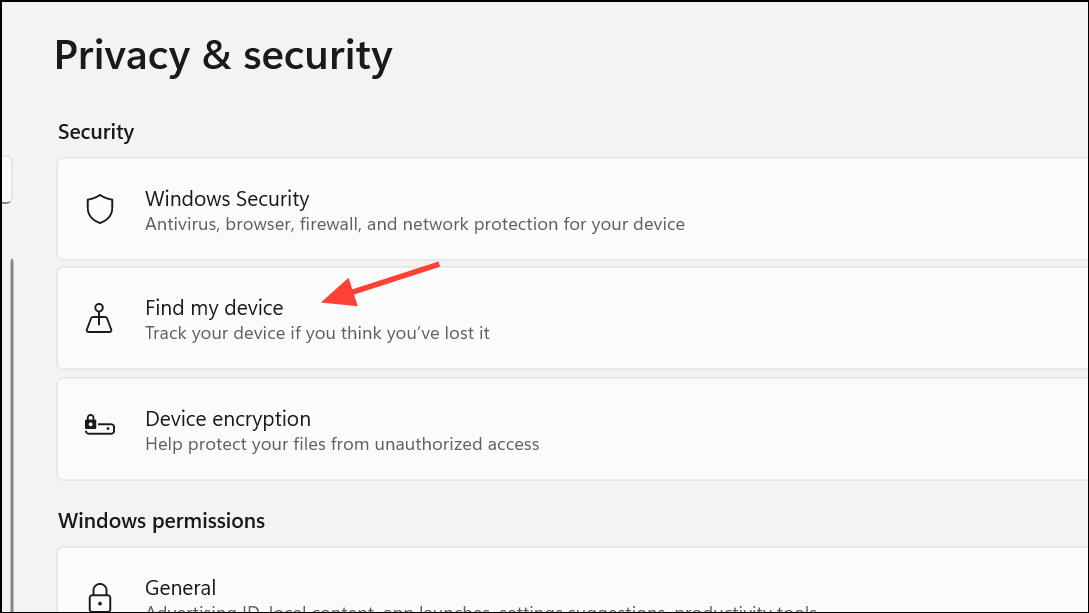
4- Turn Off the Feature: Locate the “Find My Device” switch and toggle it to the “Off” position. This action immediately disables the feature, preventing your device from sharing its location with your Microsoft account.

5- Close Settings: Simply close the Settings window. There is no need to restart your PC; the change takes effect immediately.
Method 2: Disabling Find My Device Using the Registry Editor (Advanced Users)
For advanced users or those managing multiple devices, the Registry Editor offers a more direct and often more permanent solution.
Note: Incorrectly modifying the registry can lead to system instability. Back up your registry before making changes.
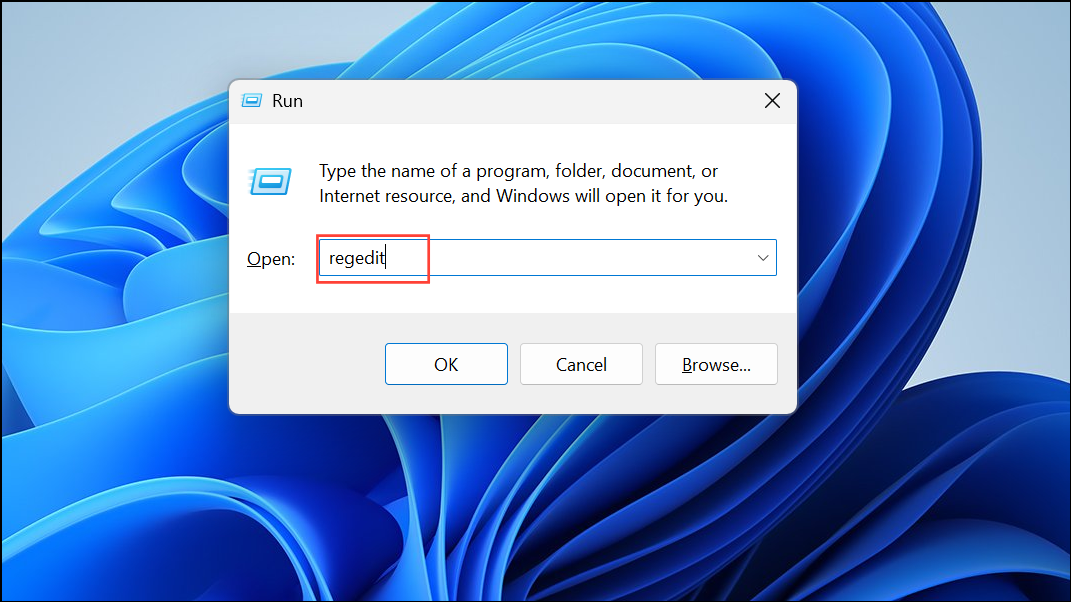
1- Open Registry Editor: Press Windows key + r, type regedit in the Run dialog, and press Enter. Grant permission if prompted by User Account Control.
2- Navigate to the FindMyDevice Key: In the Registry Editor, go to: HKEY_LOCAL_MACHINE\SOFTWARE\Policies\Microsoft\FindMyDevice

If the FindMyDevice key doesn’t exist, right-click on “Microsoft,” select “New > Key,” and name it FindMyDevice.
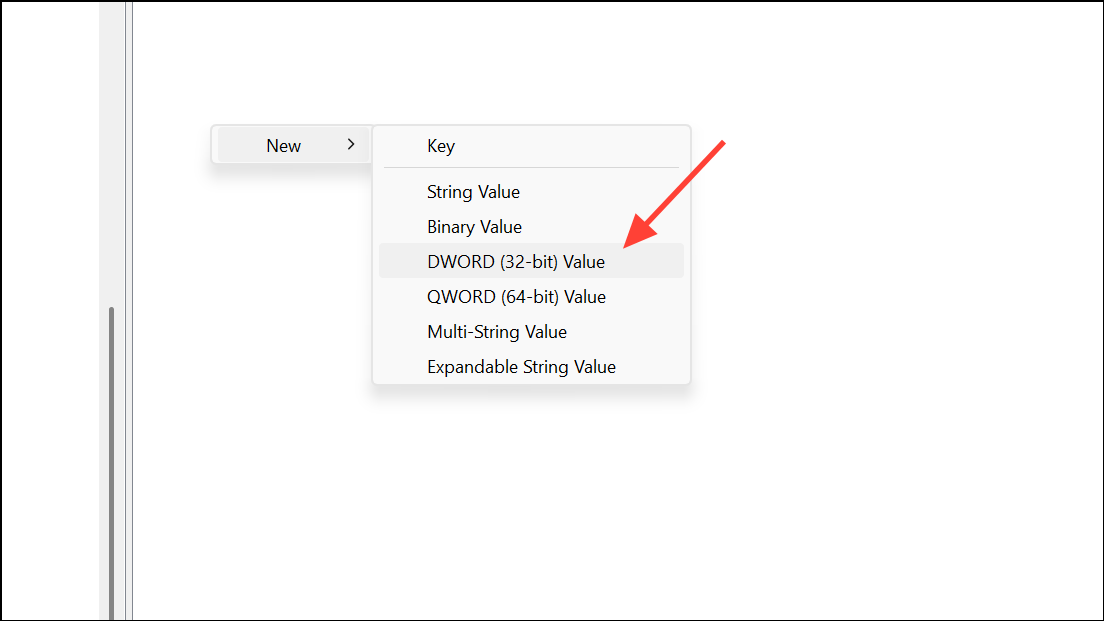
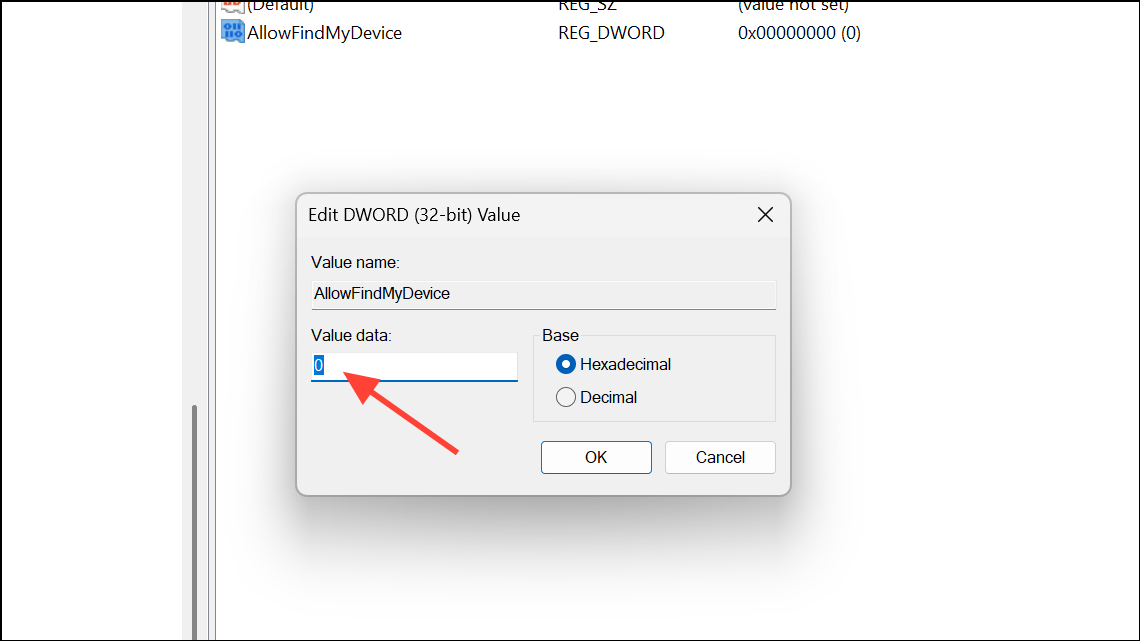
3- Create the AllowFindMyDevice Value: In the right pane, right-click and choose “New > DWORD (32-bit) Value.” Name the new value AllowFindMyDevice.
4- Disable the Feature: Double-click AllowFindMyDevice and set its “Value data” to 0. This action disables “Find My Device.”
5- Restart Your PC: Close the Registry Editor and restart your computer for the changes to take effect. After restarting, the “Find My Device” toggle in Settings will be grayed out.
Method 3: Disabling Find My Device with the Group Policy Editor (Pro, Enterprise, Education)
This method is specifically for users of Windows 11 Pro, Enterprise, or Education editions. It’s best for controlling settings on a network or within an organization.
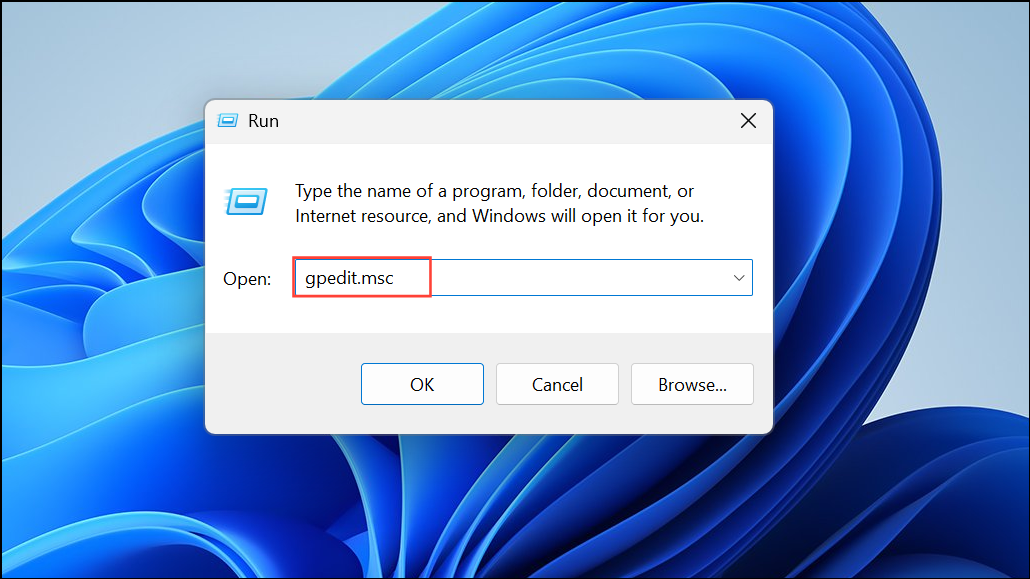
1- Open Group Policy Editor: Press Windows key + r, type gpedit.msc in the Run dialog, and press Enter.
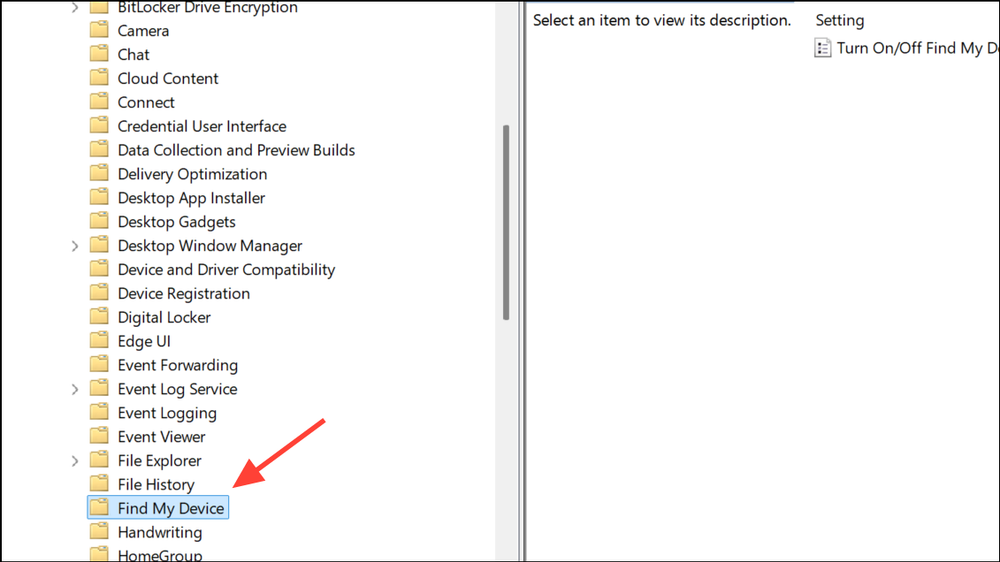
2- Navigate to Find My Device Settings: In the Local Group Policy Editor, navigate to: Computer Configuration\Administrative Templates\Windows Components\Find My Device
3- Disable Find My Device: In the right pane, double-click “Turn On/Off Find My Device.”
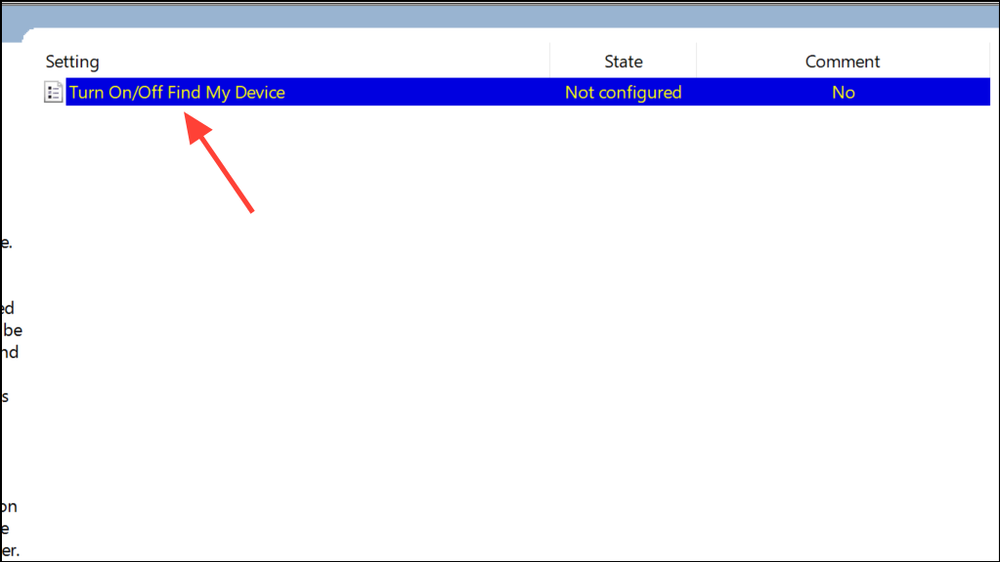
4- Apply the Disable Setting: Select “Disabled” to turn off the feature. Click “OK” to save your changes.
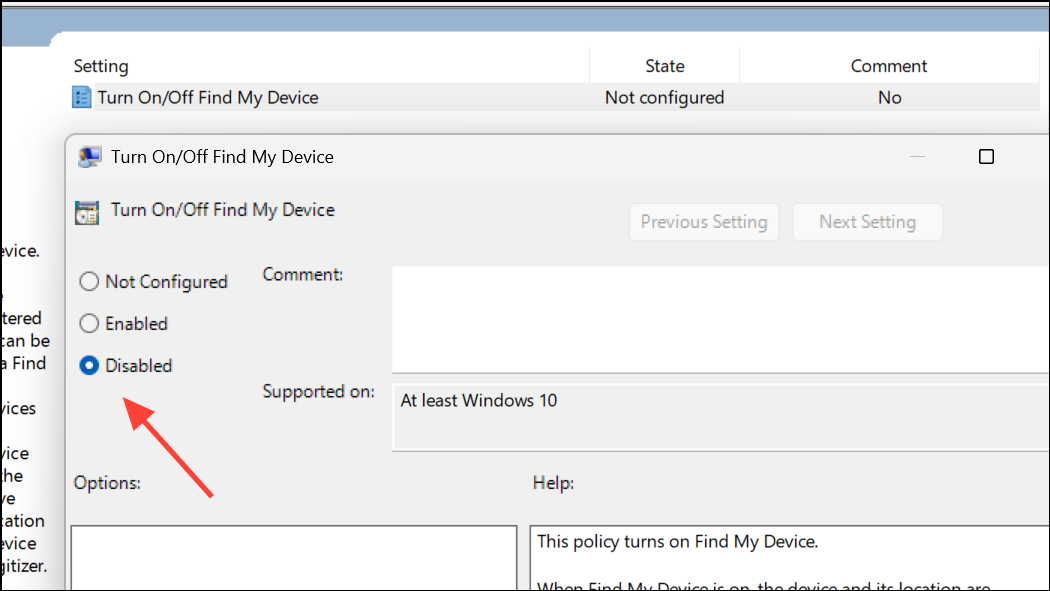
5- Restart Your Computer: Close the Group Policy Editor and restart your computer. The “Find My Device” setting is now deactivated and locked for all users on the device.
Troubleshooting Tips
If “Find My Device” is grayed out, ensure you’re signed in to your computer with a Microsoft account and have administrator privileges. Also, if the computer is managed by an organization or school, the IT administrator might have applied restrictions. In this case, contact your IT support for assistance. Remember, disabling “Find My Device” prevents tracking if your device is lost or stolen. You can easily re-enable the feature by reversing the steps above.
Final Thoughts
Taking control of your location data is a crucial step towards protecting your privacy. By following these straightforward instructions, you can easily disable “Find My Device” in Windows 11, giving you peace of mind and safeguarding your location information. Choose the method that best suits your technical expertise and system configuration, and enjoy greater control over your digital footprint.
And if you'd like to go a step further in supporting us, you can treat us to a virtual coffee ☕️. Thank you for your support ❤️!

We do not support or promote any form of piracy, copyright infringement, or illegal use of software, video content, or digital resources.
Any mention of third-party sites, tools, or platforms is purely for informational purposes. It is the responsibility of each reader to comply with the laws in their country, as well as the terms of use of the services mentioned.
We strongly encourage the use of legal, open-source, or official solutions in a responsible manner.
Comments