
Is your Google Chrome feeling more like a snail than a speed demon? Are you experiencing frustratingly slow loading times, unresponsive tabs, and stuttering video playback, even on a powerful computer? You’re not alone! Many users grapple with Chrome slowdowns, especially after updates or with specific extensions enabled. But don’t despair! This comprehensive guide is your roadmap to reclaiming Chrome’s speed and efficiency. We’ll dive into proven techniques, from simple tweaks to advanced troubleshooting, ensuring you can enjoy a smooth and lightning-fast browsing experience. Say goodbye to frustrating lags and hello to peak Chrome performance!
Understanding Why Chrome Slows Down
Several factors can contribute to a sluggish Chrome experience:
- Problematic Extensions: Resource-hogging or incompatible extensions, especially ad blockers.
- Outdated Browser: Bugs and missing optimizations in older Chrome versions.
- Bloated Cache & Data: Accumulated browsing data consuming storage and processing power.
- Inefficient Settings: Suboptimal Chrome performance and preloading configurations.
- Tab Overload: Too many open tabs straining system resources.
- Corrupted Settings: Damaged Chrome profiles or configurations.
- Malware Infections: Malicious software hijacking browser resources.
- System Limitations: Power-saving modes or network issues throttling performance.
Let’s tackle these issues head-on!
1. Disable Problematic Extensions and Ad Blockers
Extensions, particularly ad blockers, are often the prime suspects in Chrome slowdowns.
Step 1: Click the ⋮ (three-dot menu) in the top-right corner of Chrome, navigate to Extensions, and select Manage Extensions.
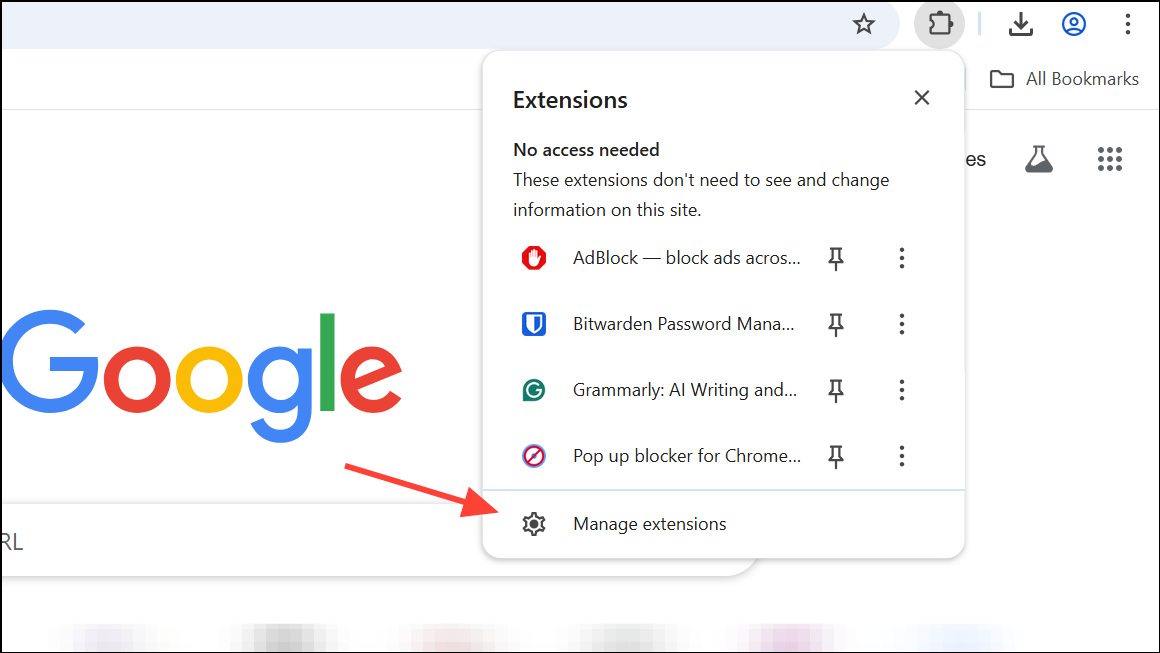
Step 2: Carefully review your installed extensions. Toggle off or click Remove next to any extension you suspect is causing problems. Start with ad blockers (AdBlock, AdBlock Plus are known offenders), security-related add-ons (like Malwarebytes Browser Guard), and even the Adobe Acrobat extension.
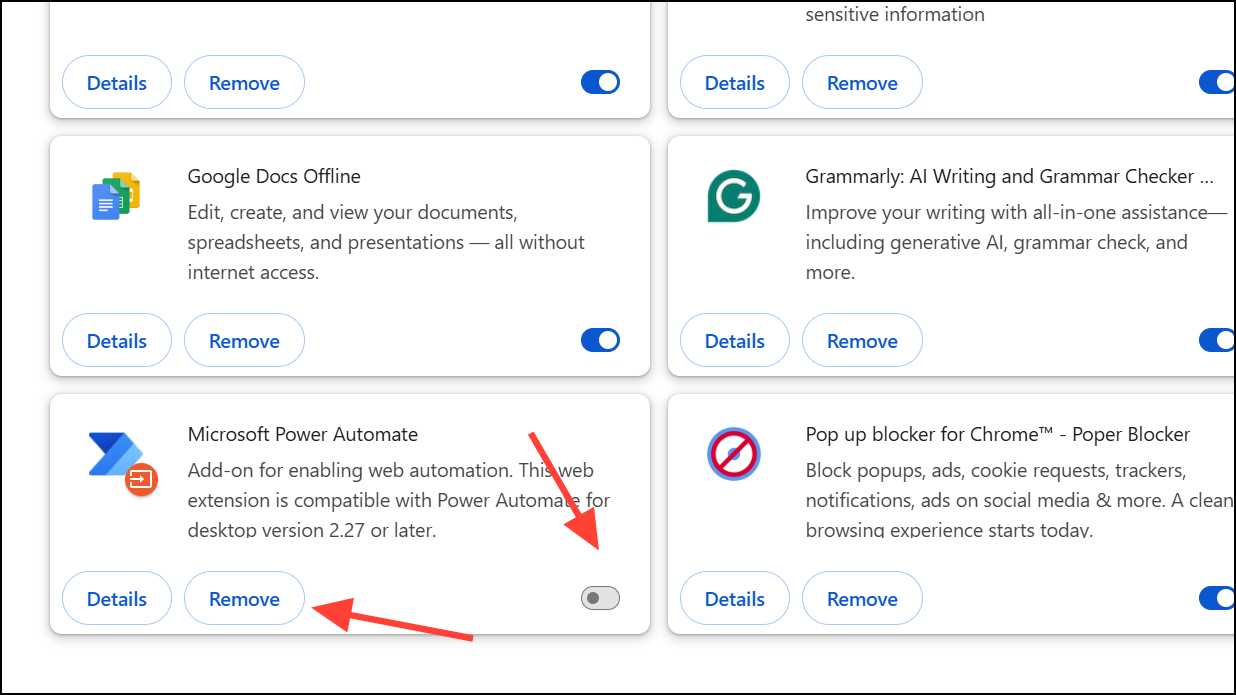
Step 3: After disabling or removing extensions, completely close and relaunch Chrome. Test the performance by opening new tabs or loading resource-intensive sites like YouTube.
Pro Tip: If you rely on ad blocking, consider switching from AdBlock or AdBlock Plus to uBlock Origin (especially the Lite version). Many users report similar ad-blocking capabilities without the performance hit.
2. Update Google Chrome to the Latest Version
Keeping Chrome up to date ensures you benefit from the latest performance improvements and bug fixes.
Step 1: Open the ⋮ menu, select Help, and click About Google Chrome.

Step 2: Chrome will automatically check for updates and install any available ones. Click Relaunch to apply the update and restart the browser.
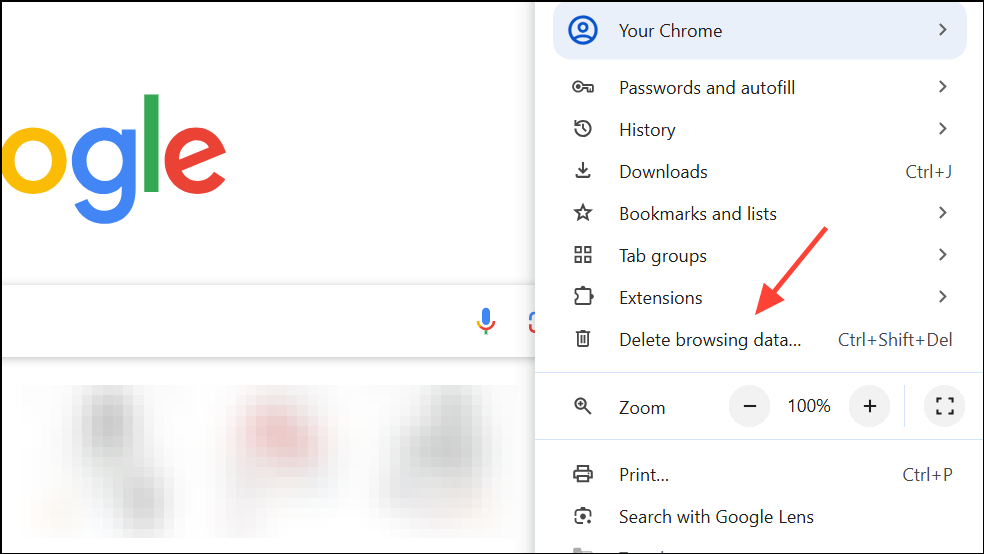
3. Clear Cache, Cookies, and Browsing Data
Accumulated browsing data can significantly slow down Chrome. Regularly clearing this data can restore browser speed.
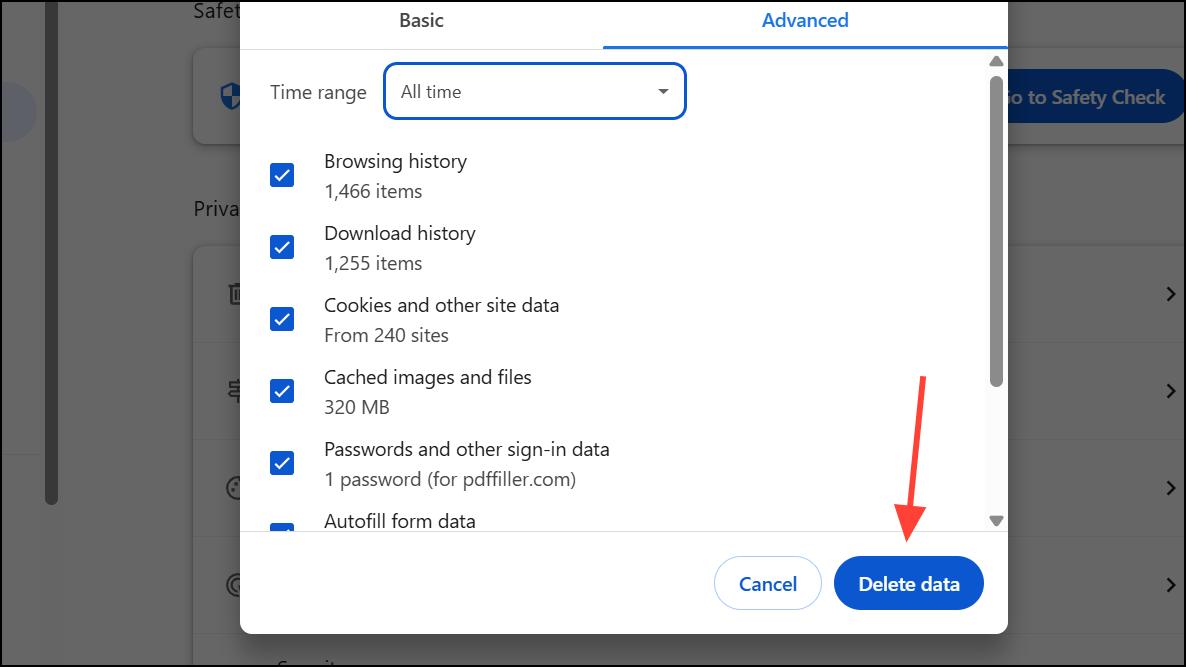
Step 1: Click the ⋮ menu, go to More Tools, and select Clear browsing data.
Step 2: In the dialog box, choose All time for the time range. Check the boxes next to Cookies and other site data, Cached images and files, and Browsing history for a thorough cleanup.
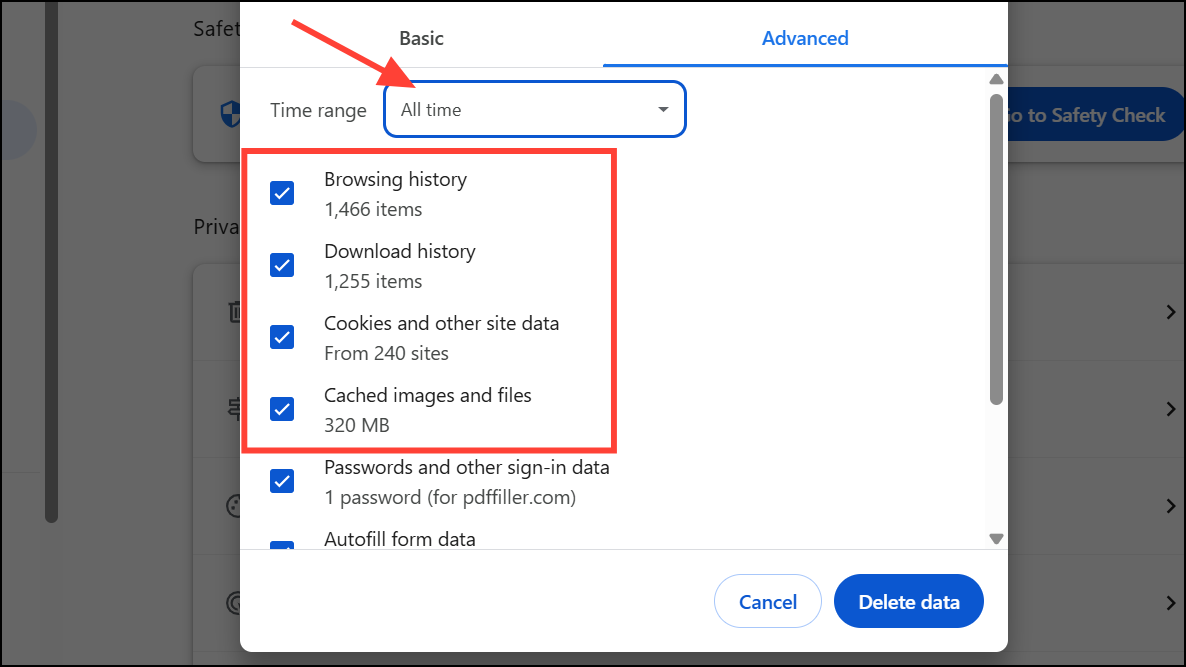
Step 3: Click Delete data, then restart Chrome.
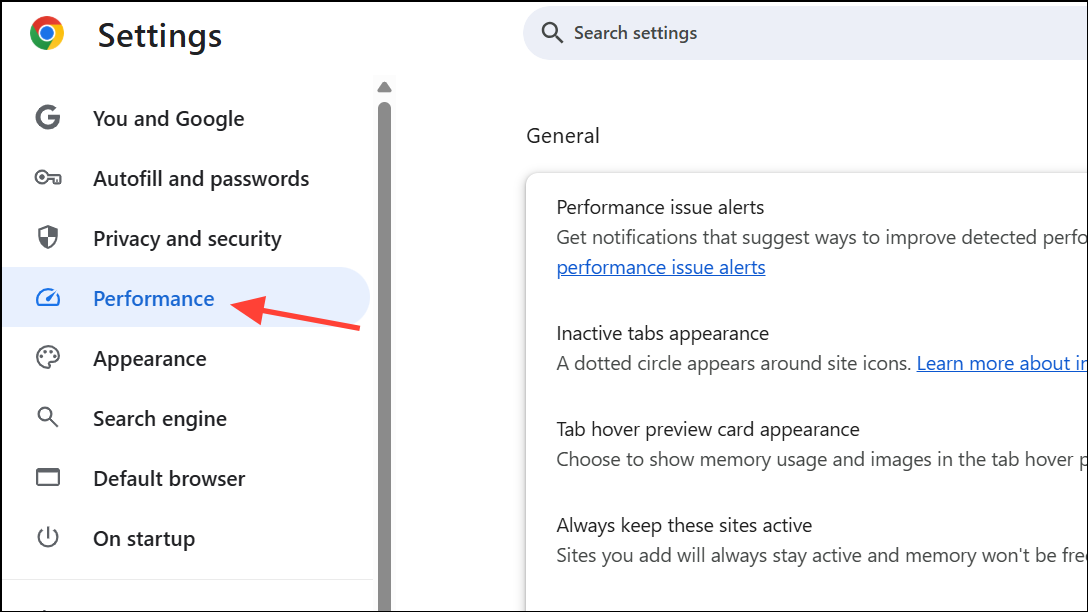
4. Adjust Chrome’s Performance and Preloading Settings
Chrome offers built-in performance controls to optimize memory usage and page loading.
Step 1: Open Chrome’s Settings and select Performance from the sidebar.
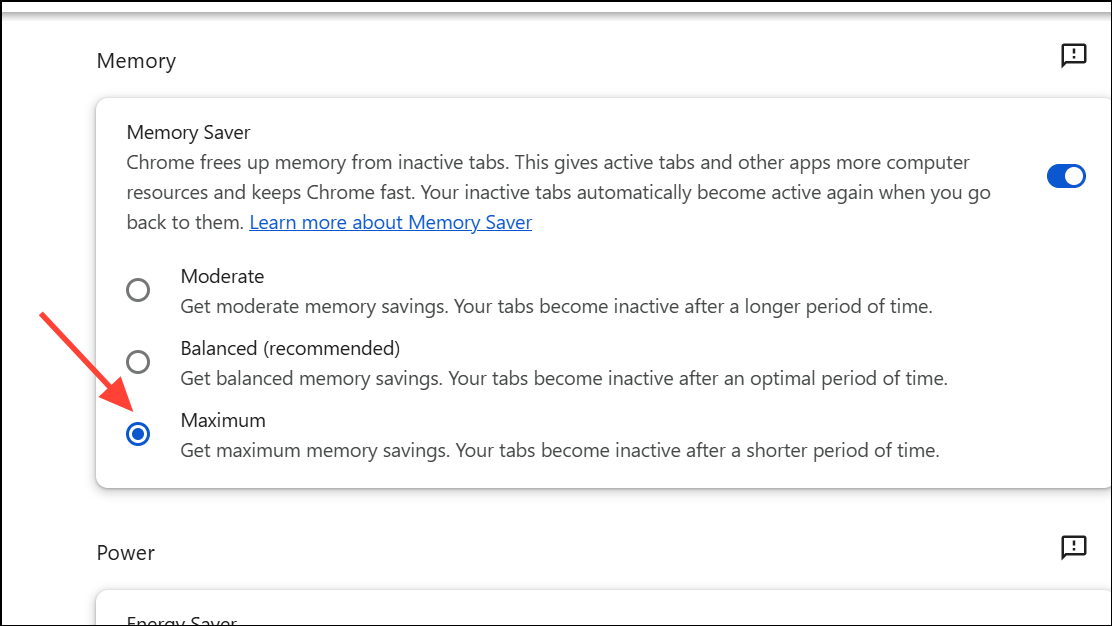
Step 2: Set Memory Saver to Maximum. This automatically frees up resources from inactive tabs, improving overall performance.
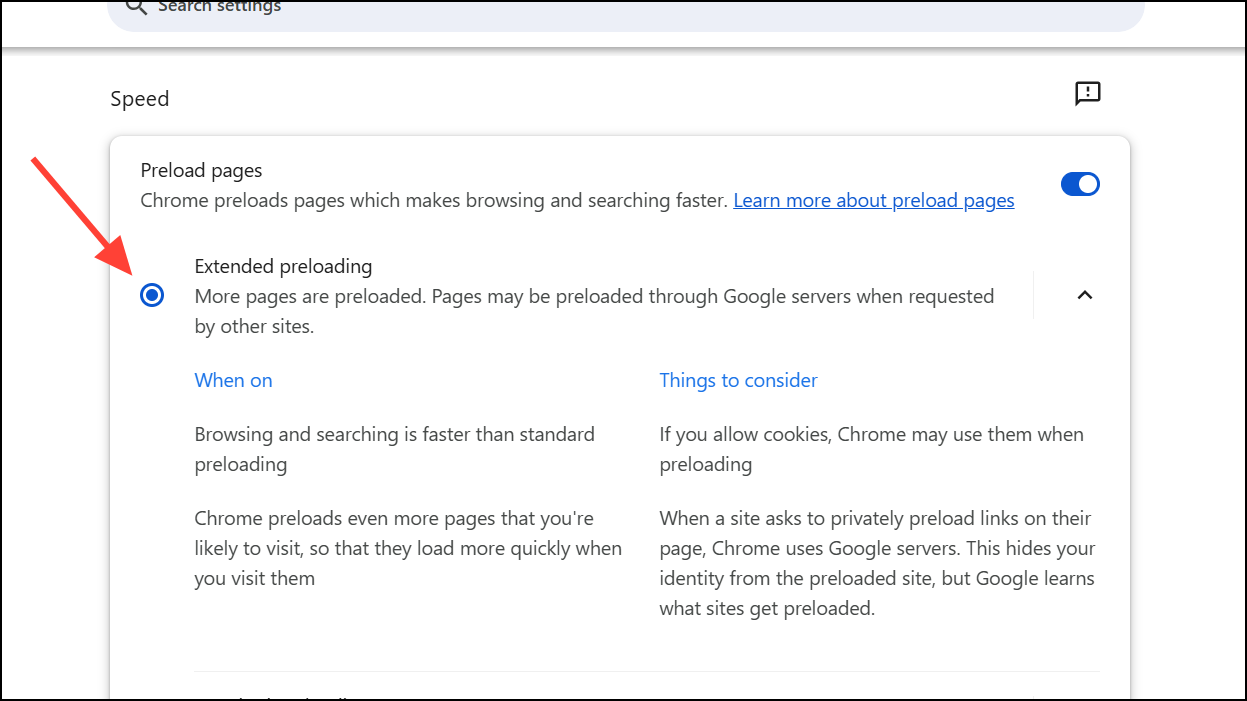
Step 3: In the Speed section, enable Preload pages. Consider choosing Extended preloading (if available) for even faster page loading. Some users have reported drastic improvements, with tab load times dropping from minutes to seconds.
Important Note: Some users have reported Chrome’s efficiency mode being enforced by Windows. To check this, open Task Manager, right-click on Chrome processes, and disable “Efficiency Mode” if it’s enabled.
5. Close Unused Tabs and Limit Active Sessions
Each open tab consumes memory and processing power. Reducing tab clutter can significantly improve Chrome’s responsiveness.
Step 1: Review your open tabs and close those you no longer need. You can click the X on each tab or use the shortcut Ctrl + W (or ⌘ + W on Mac).
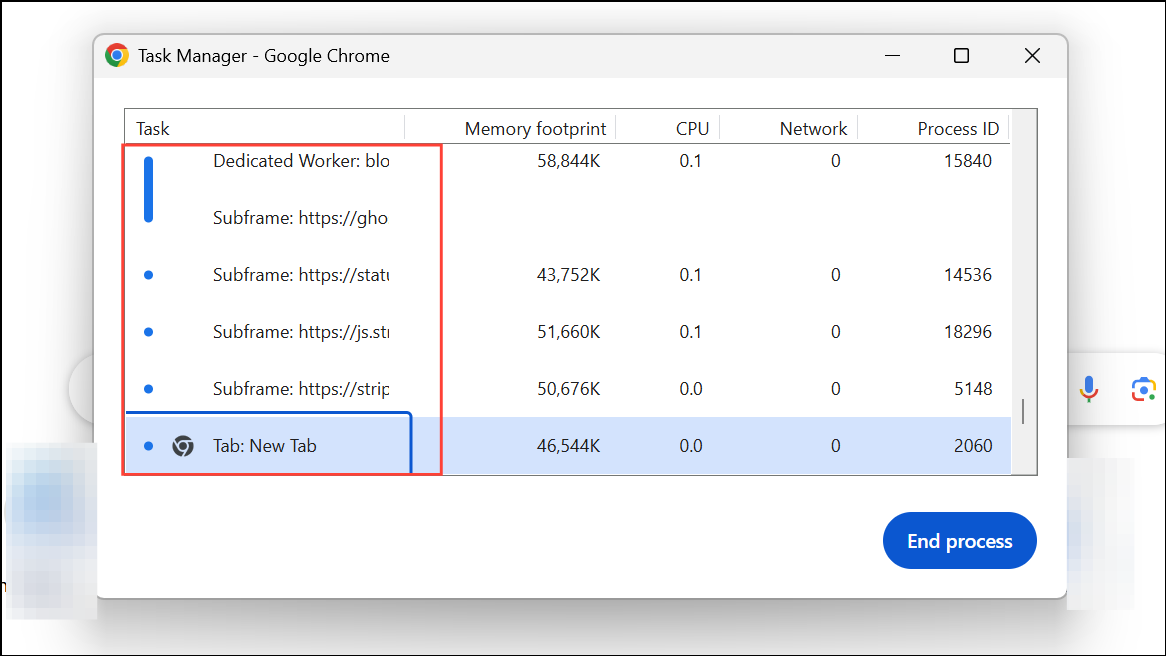
Step 2: Open Chrome’s Task Manager by pressing Shift + Esc. Sort by memory or CPU usage to identify the most resource-intensive tabs and extensions. Close or disable these to free up system resources.
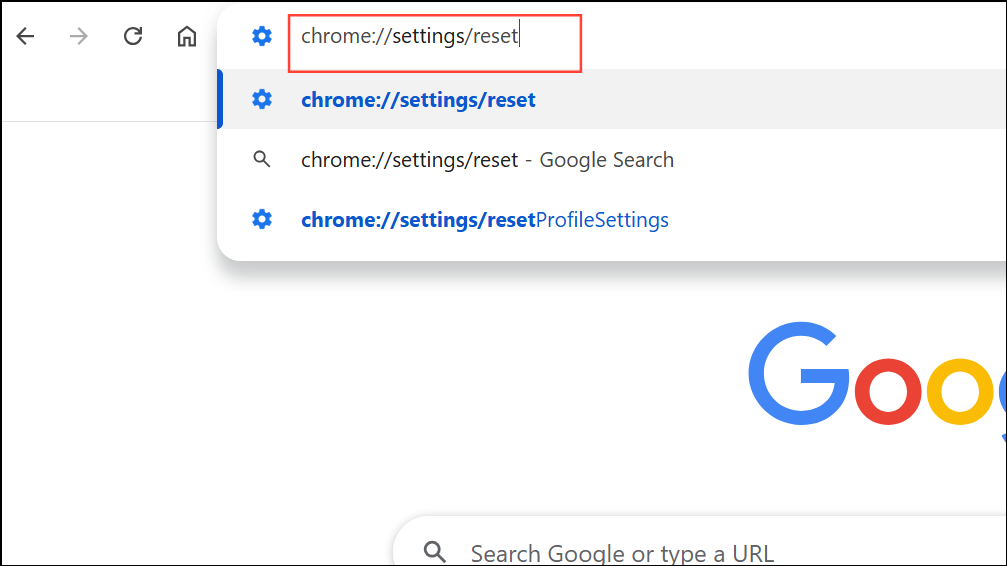
6. Reset Chrome to Default Settings
If slowdowns persist after trying the above methods, corrupted settings or profiles might be the cause. Resetting Chrome restores it to its original state.
Step 1: In Chrome’s address bar, type chrome://settings/reset and press Enter.
Step 2: Click Restore settings to their original defaults and then Reset settings in the confirmation dialog.
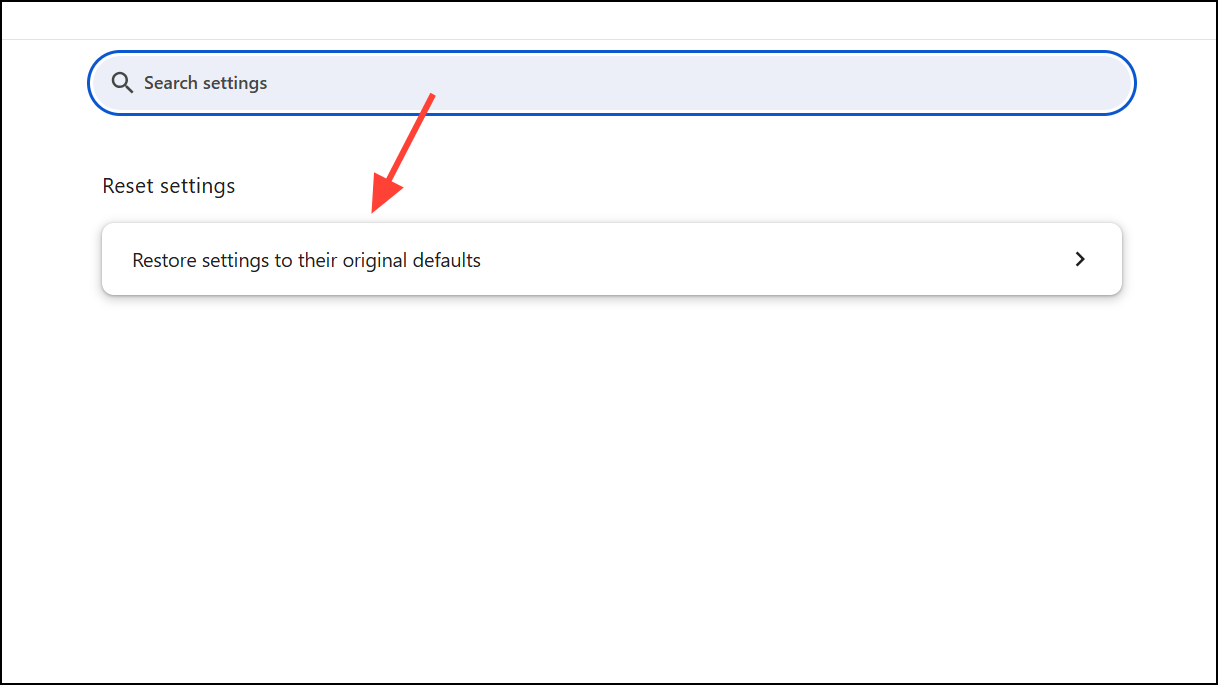
Important: This removes all extensions, custom settings, and temporary data, but retains bookmarks and saved passwords. After the reset, sign back in to your Google account and reinstall only essential extensions, testing performance before adding more.
7. Check for Malware and System Issues
Malware or unwanted programs can hijack browser resources and cause Chrome to slow down.
Step 1: Use a reputable anti-malware application (like Malwarebytes, Bitdefender, or Norton) to thoroughly scan your system for viruses, adware, or suspicious programs.
Step 2: Remove any threats found, restart your computer, and check Chrome’s performance.
Pro Tip: Enable Enhanced Protection in Chrome’s Privacy and Security settings for ongoing, real-time threat detection.

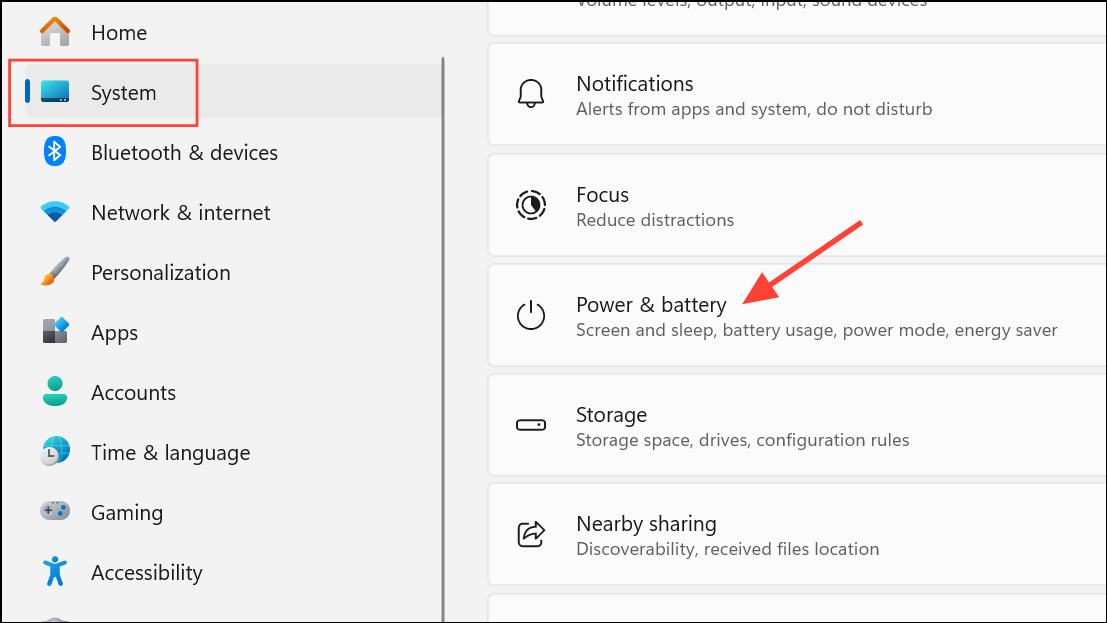
8. Optimize System Power and Network Settings
Energy-saving modes and poor network connections can also impact Chrome’s speed.
Step 1: On Windows, open Settings, go to System > Power & Battery, and set Power Mode to Best Performance.
Step 2: Check your network connection using an online speed test (like Speedtest.net). Low internet speeds or poor DNS routing can affect browser responsiveness.
Step 3: Consider switching to a public DNS provider (like Google DNS or Cloudflare) if you suspect DNS issues. You can also try connecting through a VPN with optimized routing for further troubleshooting.
Conclusion
By following these targeted solutions, you can address the most common causes of slow performance in Google Chrome. Regularly reviewing extensions, keeping Chrome updated, and optimizing your settings are crucial for maintaining a fast and reliable browsing experience. Don’t let a sluggish browser hold you back – take control and supercharge your Chrome today! You’ll be amazed at the difference a few simple tweaks can make. Happy browsing!
And if you'd like to go a step further in supporting us, you can treat us to a virtual coffee ☕️. Thank you for your support ❤️!

We do not support or promote any form of piracy, copyright infringement, or illegal use of software, video content, or digital resources.
Any mention of third-party sites, tools, or platforms is purely for informational purposes. It is the responsibility of each reader to comply with the laws in their country, as well as the terms of use of the services mentioned.
We strongly encourage the use of legal, open-source, or official solutions in a responsible manner.
Comments