
Are you trying to access a crucial file or folder in Windows 11, only to be met with the infuriating “Unable to display current owner” error? This frustrating message can bring your workflow to a halt, preventing you from viewing, modifying, or even deleting essential data. It’s a common stumbling block for many users, often signaling underlying permission issues, file system corruption, or conflicts with third-party software.
Don’t despair! This comprehensive guide is designed to empower you with step-by-step solutions to conquer the “Unable to display current owner” error in Windows 11. We’ll delve into various methods, from powerful command-line fixes to simpler graphical adjustments, ensuring you regain full control over your digital assets. Let’s reclaim your files and restore seamless access to your system!
Windows 11 Error: “Unable to Display Current Owner” – Your Definitive Fix Guide
The “Unable to display current owner” error in Windows 11 is a clear indicator that your user account, or even the system itself, lacks the necessary permissions to identify or interact with the ownership information of a specific file or folder. This can happen for several reasons:
- Corrupted Permissions: The Access Control List (ACL) entries for the file or folder might be damaged or incorrectly configured.
- Incorrect Ownership: The item might be owned by a non-existent user ID (SID), a previous installation, or a system process that’s no longer active.
- File System Issues: Underlying corruption in the file system (NTFS) can prevent proper handling of file metadata, including ownership.
- Third-Party Software Interference: Certain security suites, encryption tools, or folder lockers can override default Windows permissions, leading to conflicts.
- Malware Activity: In rare cases, malicious software might alter file permissions to hide itself or prevent deletion.
Regardless of the root cause, resolving this issue typically involves re-establishing proper ownership and permissions. Here are the most effective methods:
Method 1: Taking Ownership and Granting Full Control via Command Prompt (Recommended)
This method is often the most robust and effective, as it allows you to directly manipulate file system permissions at a system level, bypassing many common graphical interface limitations or “Access Denied” messages.
1- Open an Elevated Command Prompt:
- Press Win + S to open the search bar.
- Type
cmd. - Right-click on “Command Prompt” in the search results.

- Select “Run as administrator.” Confirm the User Account Control (UAC) prompt if it appears.
Take Ownership of the Item:
In the Command Prompt window, type the following command, replacing "PATH" with the actual full path to the problematic file or folder (e.g., "C:\Users\YourUser\Documents\ProblemFolder"): takeown /F "PATH" /A /R /D Y
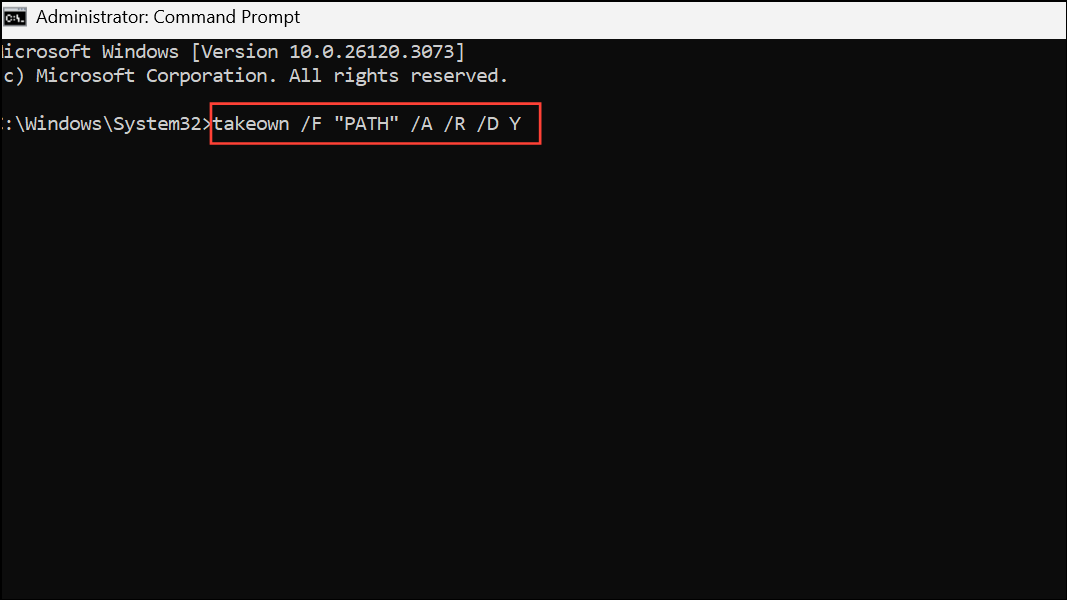
Explanation of Switches:
/F "PATH": Specifies the file or folder you want to take ownership of. Always enclose paths with spaces in double quotes.
/A: Grants ownership to the built-in Administrators group. This is generally safer than assigning it to your individual user account initially.
/R: Performs a recursive operation, meaning it takes ownership of all subfolders and files within the specified path. This is crucial for folders.
/D Y: Suppresses confirmation prompts during recursive operations, automatically saying “Yes” to all.
Press Enter. You should see a success message indicating that ownership has been obtained.
Grant Full Control Permissions:
After successfully taking ownership, you need to grant the Administrators group (or your specific user account) full control. Type the following command, again replacing "PATH": icacls "PATH" /grant administrators:F /T
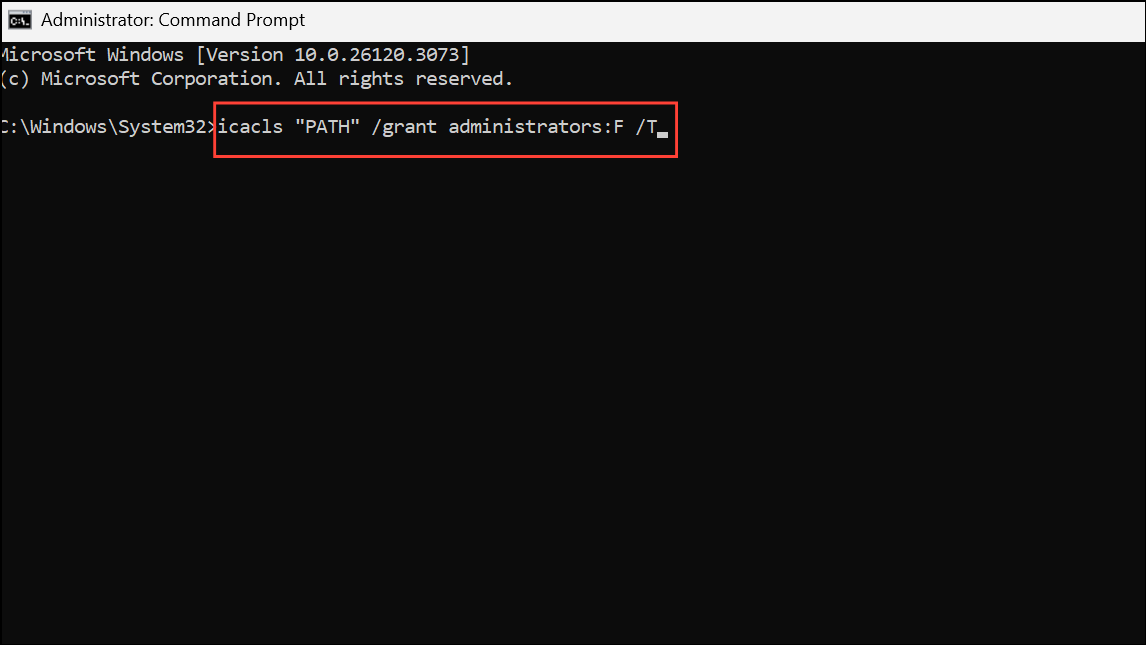
Explanation of Switches:
icacls: A command-line utility used to display or modify Access Control Lists (ACLs) for files and folders.
/grant administrators:F: Grants “Full control” (F) permissions to the administrators group.
/T: Applies the permission changes recursively to all subdirectories and files.
Press Enter. You should see confirmation that the permissions were processed for each file/folder.
Test Access: Close the Command Prompt and attempt to access, modify, or delete the file/folder. If the error persists, try restarting your computer and then test again.
Method 2: Activating and Using the Hidden Built-in Administrator Account
Windows 11 includes a powerful, hidden Administrator account with ultimate system privileges. While generally disabled for security, enabling it temporarily can resolve stubborn permission issues that even your regular administrator account can’t tackle. Remember to disable it afterward for security reasons.
Open an Elevated Command Prompt (as described in Method 1, Step 1).
Activate the Built-in Administrator:
Type the following command and press Enter: net user administrator /active:yes
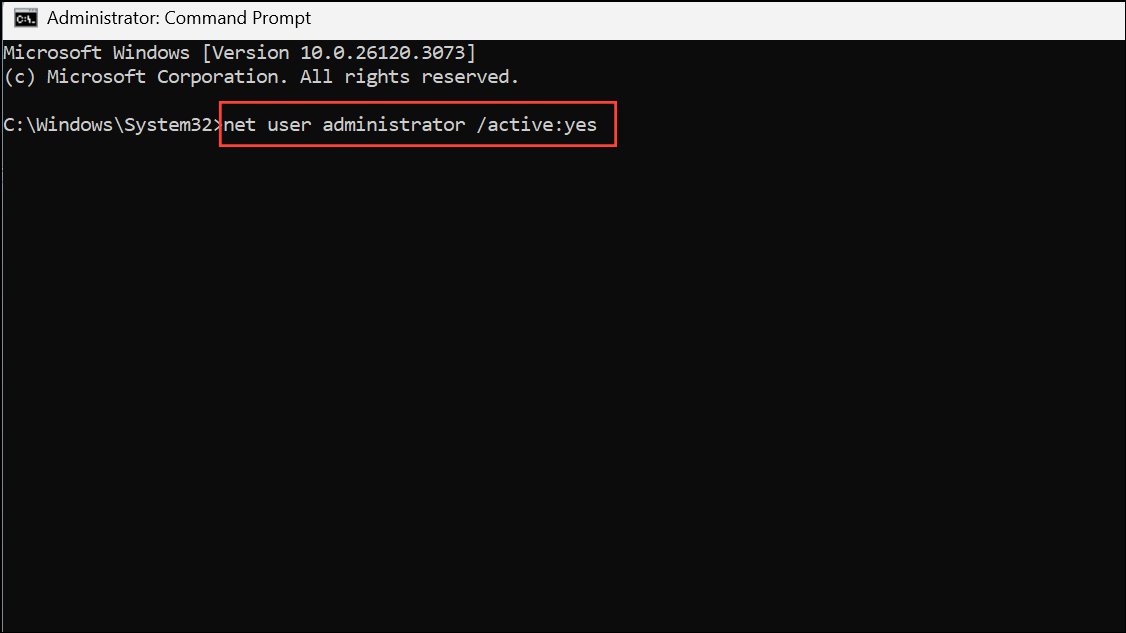
You should see a message confirming the command completed successfully.
Log In as Administrator:
Log out of your current Windows user session (Start Menu > your user icon > Sign out).
On the login screen, you should now see a new account named “Administrator.” Click on it to sign in. There will be no password initially.
Resolve the Issue:
Once logged in as the built-in Administrator, attempt to access, modify, or copy the problematic file or folder. You should have full control.
You can now try to set correct permissions for your regular user account or move the data to a new location.
Disable the Built-in Administrator Account (Crucial Security Step):
After resolving the issue, log out of the “Administrator” account and log back into your regular user account.
- Open an Elevated Command Prompt again.
- Type the following command and press Enter:
net user administrator /active:no

This disables the account, significantly reducing the risk of unauthorized access or malware exploitation.
Method 3: Checking and Repairing File System Errors
File system corruption can lead to incorrect or unreadable ownership information. Running a disk check (chkdsk) can identify and repair such errors.
Open an Elevated Command Prompt (as described in Method 1, Step 1).
Run Disk Check:
Type the following command, replacing C: with the drive letter where the problematic file/folder is located: chkdsk C: /f
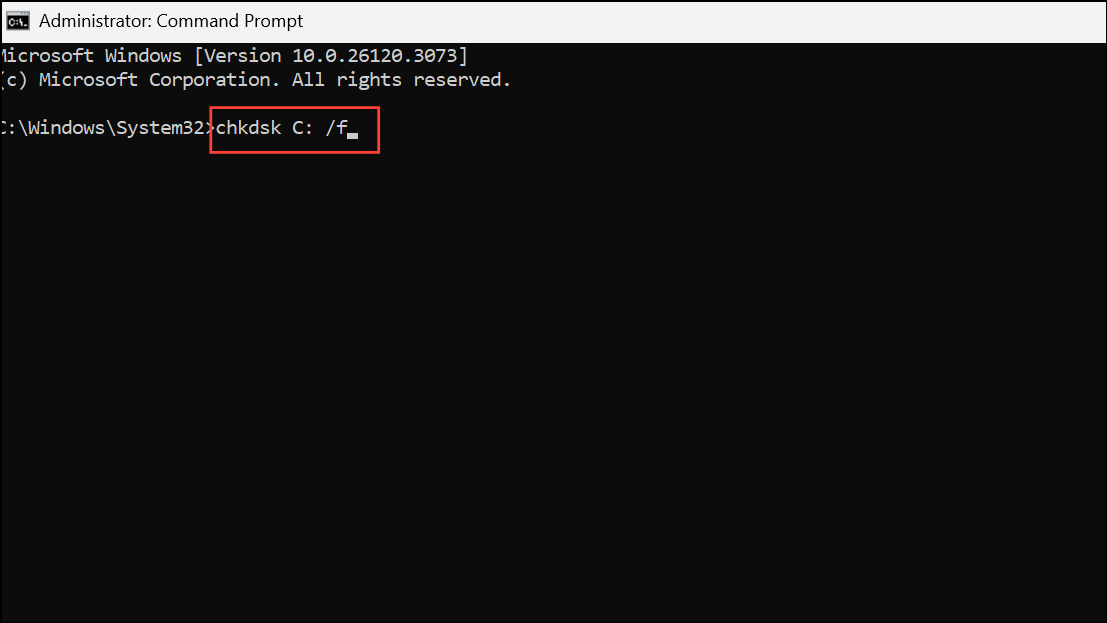
Explanation of Switches:
/f: Tells chkdsk to fix any errors it finds on the disk.
If the drive is currently in use (which is common for the C: drive), you will be asked if you want to schedule the check for the next restart. Type Y and press Enter.
Restart your computer. The chkdsk process will run before Windows boots up, potentially taking some time depending on your drive size and number of errors. Do not interrupt it.
For Advanced Scenarios (Use with Caution):
If regular chkdsk /f doesn’t resolve it, and you suspect deeply embedded security descriptor issues, you might use /sdcleanup (available from Windows 8 onwards), but this is more aggressive and should be a last resort. chkdsk C: /f /sdcleanup
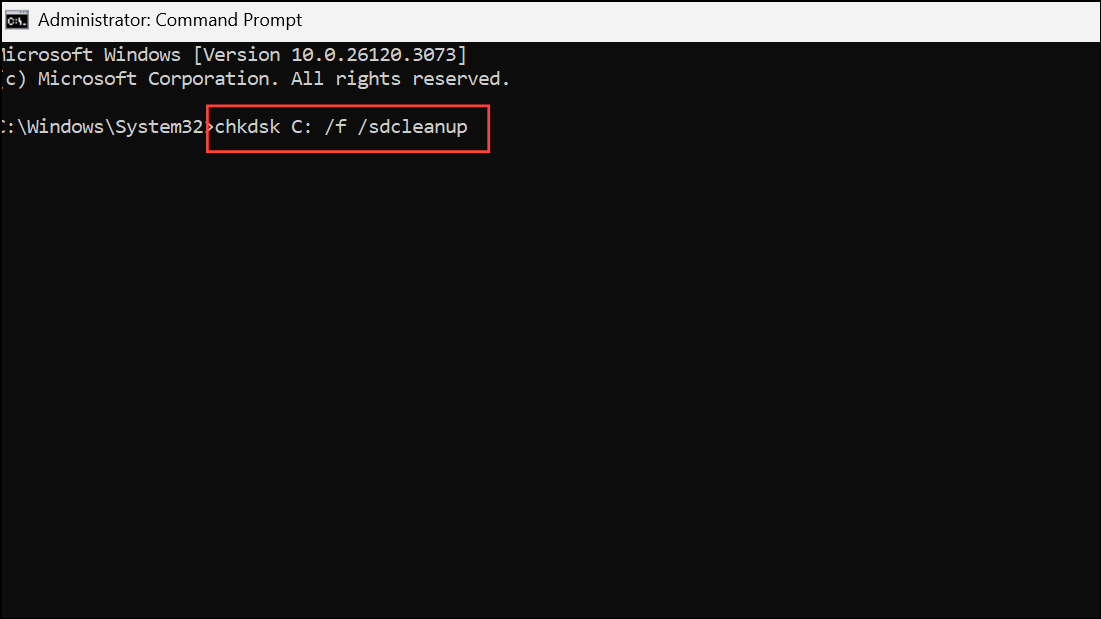
This switch attempts to clean up security descriptor data, which can sometimes fix complex permission problems. Use it only if other methods fail and after backing up critical data, as it can modify security settings.
Method 4: Removing or Disabling Conflicting Third-Party Software
Certain security programs, folder encryption tools, or specific antivirus suites can sometimes interfere with Windows’ native permission management, leading to the “Unable to display current owner” error.
Open Programs and Features:
Press Win + R to open the Run dialog.
Type appwiz.cpl and press Enter. This opens the “Programs and Features” window.

Identify and Uninstall/Disable Suspect Software:
Browse the list for any folder locking software, advanced encryption tools, or security suites that might be overly restrictive.
Select the suspect application and click “Uninstall.” Follow the on-screen prompts.
If uninstalling is not an option, try temporarily disabling the software (consult its documentation for how to do this).
Restart and Test: After uninstalling or disabling, restart your computer and attempt to access the file/folder. If this resolves the issue, you might need to find an alternative software or adjust the problematic application’s settings.
Method 5: Checking and Modifying File Attributes (Read-Only)
Occasionally, a file or folder might be marked as “Read-only,” which can indirectly prevent ownership changes or direct modifications, leading to access errors.
Access Properties:
- Right-click on the affected file or folder.
- Select “Properties” from the context menu.

Adjust Attributes:
- In the “Properties” window, go to the “General” tab.
- Under the “Attributes” section, ensure that the “Read-only” checkbox is unchecked.

- Click “Apply” and then “OK.”
Test Access: Try accessing or modifying the item again. While this is a simpler fix, it’s worth checking as a quick potential solution.
Method 6: Resetting Permissions via the Graphical Interface (Advanced Security Settings)
If you prefer a graphical approach or want to verify permissions after using command-line methods, you can use the advanced security settings.
Access Security Tab:
Right-click the problematic file or folder and select “Properties.”
Go to the “Security” tab.
Open Advanced Security Settings:
Click the “Advanced” button.
Change Owner (If Applicable):
At the top of the “Advanced Security Settings” window, next to “Owner,” click “Change.”
In the “Select User or Group” dialog, type your user account name or Administrators (to assign ownership to the local Administrators group), then click “Check Names” and “OK.”
Crucially: Check the box that says “Replace owner on subcontainers and objects” if you’re working with a folder. Click “Apply” and “OK.”
Add/Modify Permissions:
Back in the “Advanced Security Settings” window, under the “Permissions” tab, you might need to add or edit permissions for your user account or the “Administrators” group.
Click “Add.”
Click “Select a principal,” type your username or Authenticated Users (to grant access to all logged-in users), and click “Check Names” then “OK.”
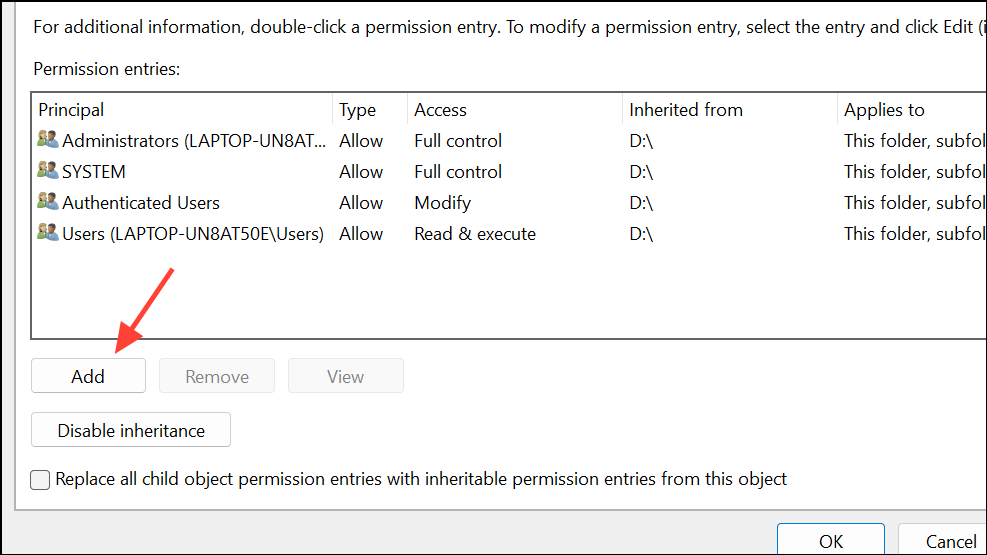
Under “Basic permissions,” check the “Full control” box.
Make sure “Apply to:” is set appropriately (e.g., “This folder, subfolders and files”).
Click “OK.”
If there are existing inherited permissions blocking access, you might need to click “Disable inheritance” and then “Convert inherited permissions into explicit permissions on this object” to gain full control. Then you can remove unwanted entries and add the correct ones.
Apply and Test: Click “Apply” and then “OK” on all open windows. Test access to the file/folder.
Method 7: Checking for Locked Files or System Processes
Sometimes, the file or folder is simply in use by another application or a background system process, preventing any changes, including ownership.
- Restart Your Computer: A simple restart can close all open file handles and processes that might be locking the file.
- Boot into Safe Mode: In Safe Mode, Windows runs with minimal services and drivers. If you can access the file/folder in Safe Mode, it indicates that a third-party application or service in your normal boot environment is causing the conflict.
- Use Resource Monitor or Process Explorer: For advanced users, tools like Windows’ built-in Resource Monitor (found by searching for “Resource Monitor”) or Sysinternals Process Explorer can help identify which process has a handle on a specific file.
Additional Considerations and Proactive Measures
- Data Backup is Key: Before attempting any advanced permission changes, especially
chkdsk /sdcleanupor extensiveicaclscommands, always back up critical data. - New User Profile: If the issue is widespread and affects many files only for your current user profile, consider creating a new user account in Windows 11 and migrating your data. This can sometimes resolve deep-seated profile corruption.
- Avoid Leaving Built-in Administrator Enabled: As reiterated, the built-in Administrator account is a powerful tool but a security risk if left active. Always disable it after use.
- Regular System Maintenance: Keep your Windows 11 system updated, run regular antivirus scans, and ensure your disk health is checked periodically to prevent file system and permission issues.
By systematically working through these methods, you should be able to resolve the “Unable to display current owner” error in Windows 11, restoring your ability to manage your files and folders effectively. Regaining control over your digital assets means a smoother, more productive computing experience, free from frustrating access denied messages.
And if you'd like to go a step further in supporting us, you can treat us to a virtual coffee ☕️. Thank you for your support ❤️!

We do not support or promote any form of piracy, copyright infringement, or illegal use of software, video content, or digital resources.
Any mention of third-party sites, tools, or platforms is purely for informational purposes. It is the responsibility of each reader to comply with the laws in their country, as well as the terms of use of the services mentioned.
We strongly encourage the use of legal, open-source, or official solutions in a responsible manner.
Comments