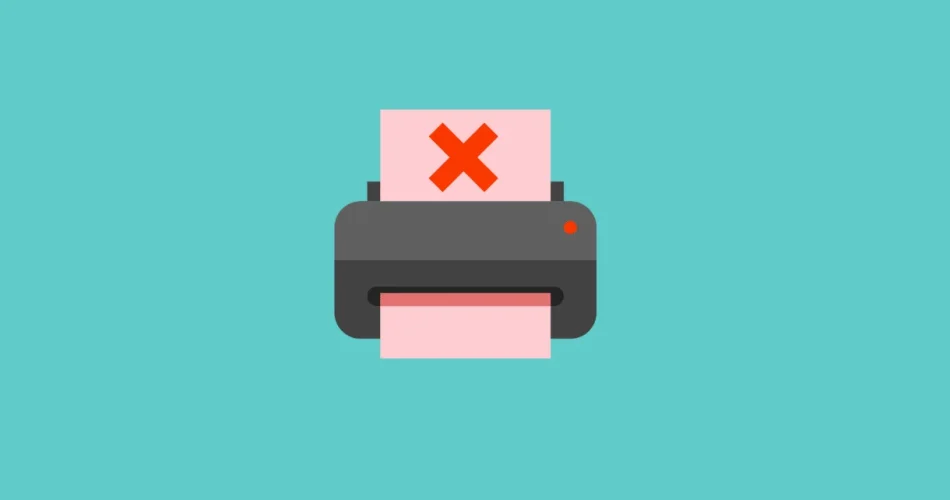
Is your Canon printer stubbornly refusing to print on your Windows 11 machine, flashing the frustrating Error 853? Don’t let this printing predicament disrupt your workflow! Error 853 on Canon printers often stems from driver conflicts or issues with the Secure Print feature, preventing documents from reaching your printer. This comprehensive guide walks you through effective, step-by-step solutions to resolve this common problem, restoring your printing capabilities and getting you back to productivity.
Understanding Error 853: What Causes the Printing Problem?
Error 853 typically indicates a problem with how Windows 11 communicates with your Canon printer. This can be due to outdated or incorrect drivers, or the Secure Print feature interfering with the print job processing. Resolving this involves ensuring the correct driver is installed, disabling conflicting features, and utilizing Windows’ built-in troubleshooting tools.
Solution 1: Install the Canon UFR II Driver
The Canon UFR II driver is specifically designed for Canon printers and is often the key to resolving internal processing errors that trigger Error 853. This driver ensures optimal communication between your computer and printer.
Steps to Install the Canon UFR II Driver:
- Download the Driver: Visit the official Canon support website and download the Canon Generic Plus UFR II printer driver that corresponds to your specific printer model. Ensure you select the correct version for Windows 11.
- Run the Installer: Execute the downloaded installer file. Follow the on-screen instructions to install the driver. You may be prompted to select your printer model during the installation. This ensures the driver is perfectly matched to your device.
- Restart Your Computer: After the installation is complete, restart your computer. This crucial step allows Windows 11 to recognize the newly installed driver and properly associate it with your Canon printer.
Verify the Driver in Device Manager:
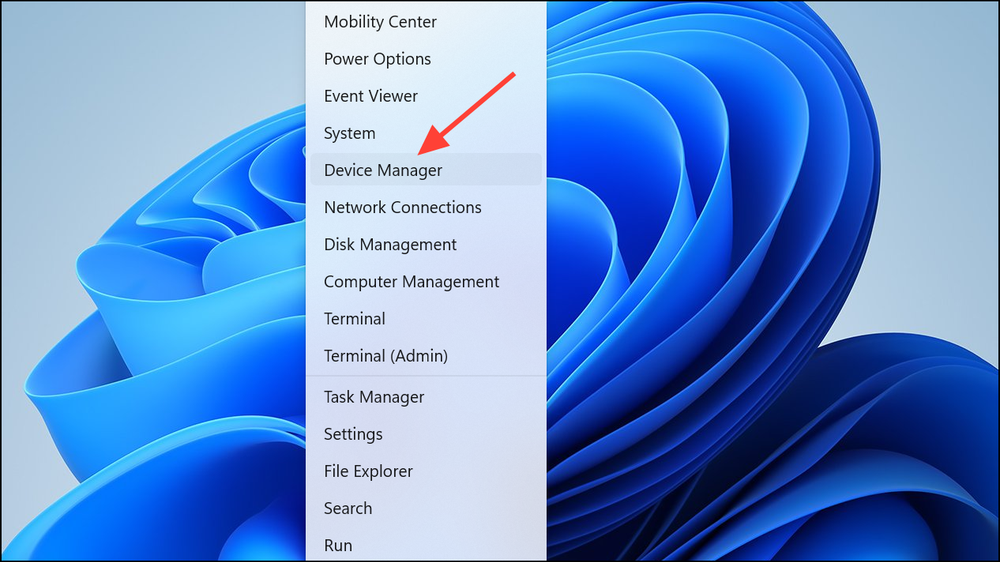
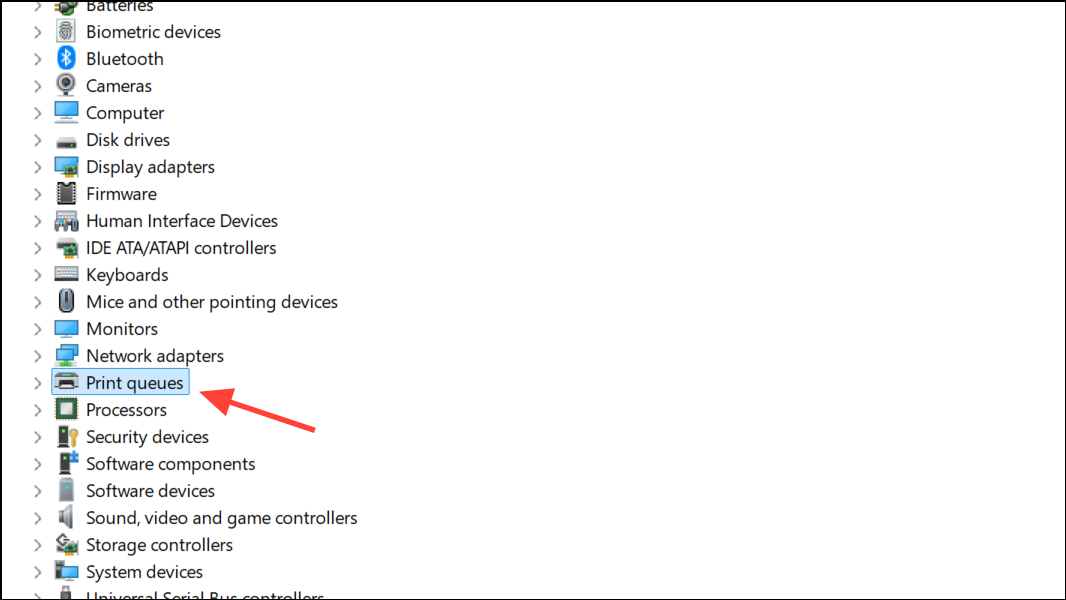
1- Press the Win + X keys and select “Device Manager”.
2- Expand the “Print queues” section.
3- Right-click on your Canon printer and select “Properties.”
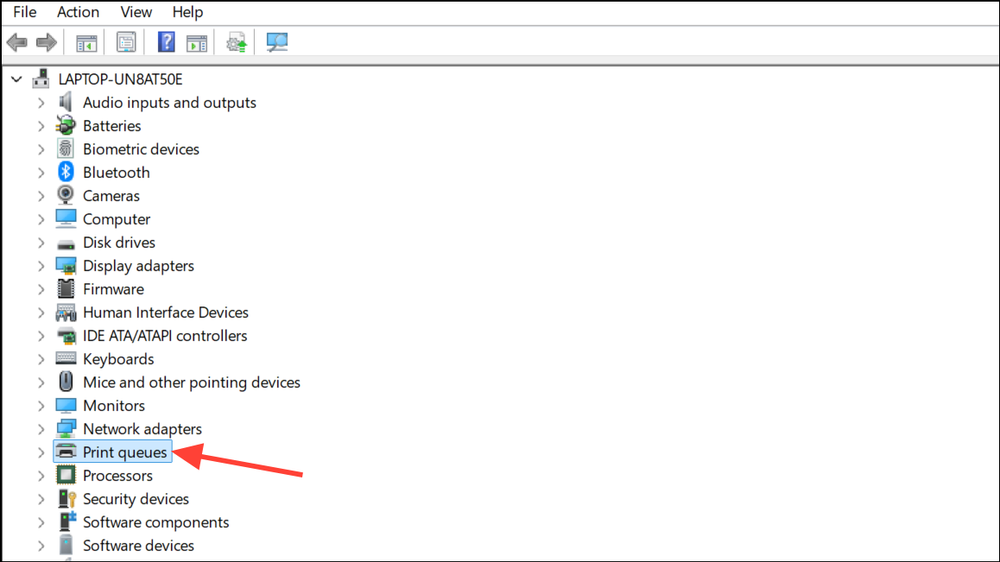
In the “Drivers” tab, confirm that the Canon Generic Plus UFR II driver is selected. If not, use the dropdown menu to choose the correct driver, apply the changes, and restart your PC.
Solution 2: Disable Secure Print on Your Canon Printer
Secure Print, while useful for protecting sensitive documents, can sometimes cause conflicts that lead to Error 853. Disabling it can often resolve the issue.
Steps to Disable Secure Print:
- Access the Printer’s Control Panel: Use the control panel on your Canon printer and press the “Menu” button.
- Navigate to Function Settings: Use the arrow keys to navigate to the “Function Settings” menu and select it. You might see “Secure Print” or “Secure Printing” depending on your model.
- Disable Secure Print: Within the Secure Print settings, set “Use Secure Print” to “Off” or “Disabled.” Save and confirm your changes.
- Power Cycle Your Printer: Turn off your printer. Unplug the power cord from the printer for at least 10 seconds, then plug it back in and turn the printer on again. This resets the printer’s configuration and clears any residual errors.
Solution 3: Run the Windows Printer Troubleshooter
Windows 11 includes a built-in troubleshooter designed to automatically detect and fix common printing problems. This can be a quick and effective solution.
Steps to Run the Windows Printer Troubleshooter:
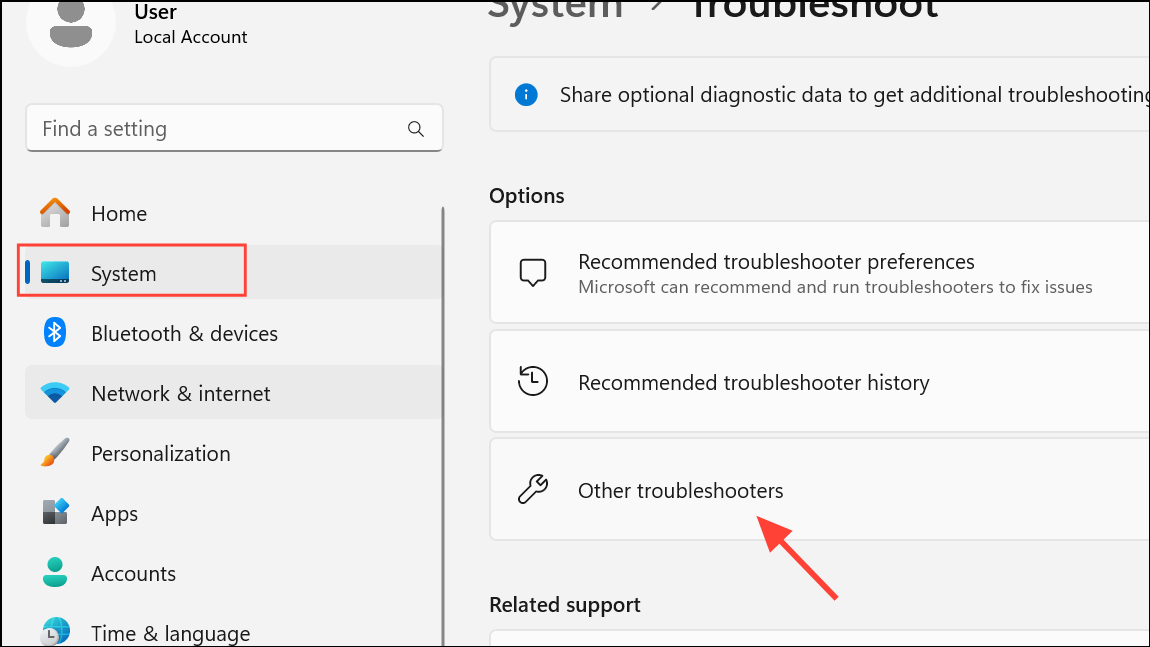
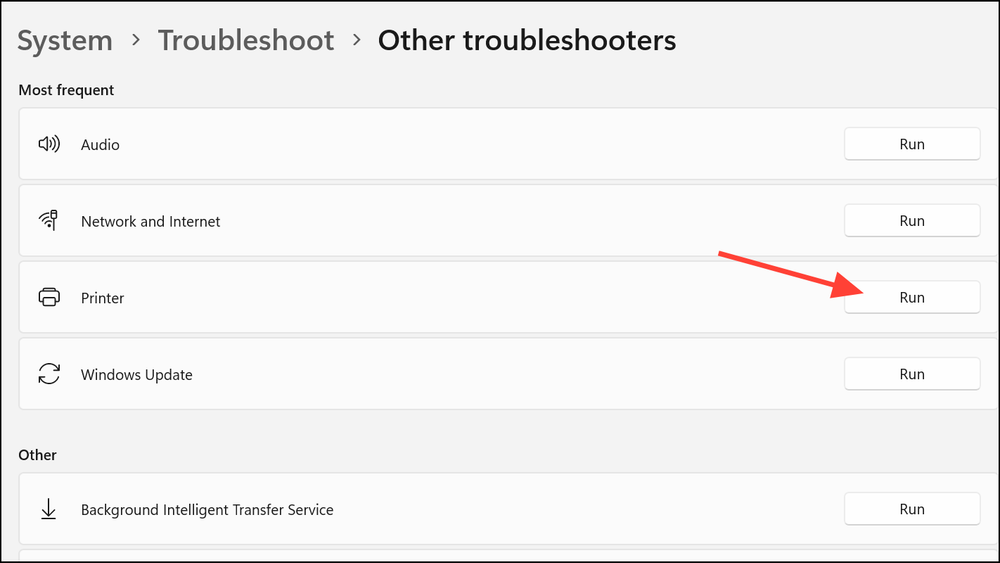
1- Open Settings: Press the Win + I keys to open the Settings app.
2- Access Troubleshooters: Go to “System” > “Troubleshoot” > “Other troubleshooters”.
3- Run the Printer Troubleshooter: Locate “Printer” in the list and click the “Run” button. Follow the on-screen prompts as Windows attempts to diagnose and fix any printing issues. The troubleshooter may reset print queues, restart print services, or identify misconfigured settings.
Solution 4: Reinstall the Printer Driver
If the previous steps haven’t resolved the issue, reinstalling the printer driver can help. This removes any potential file corruption or installation issues.
Steps to Reinstall the Printer Driver:
1- Open Device Manager: As described in the first solution.
2- Uninstall the Printer: In Device Manager, right-click on your Canon printer under “Print queues” and select “Uninstall device.” Confirm the uninstall process and remove the driver.
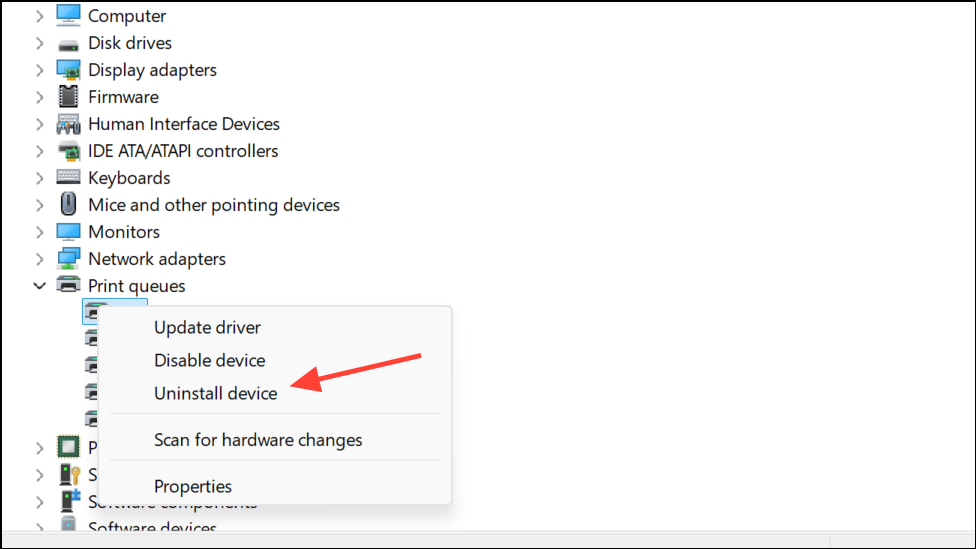
3- Restart Your Computer: Restart your computer to clear any cached settings related to the old driver.
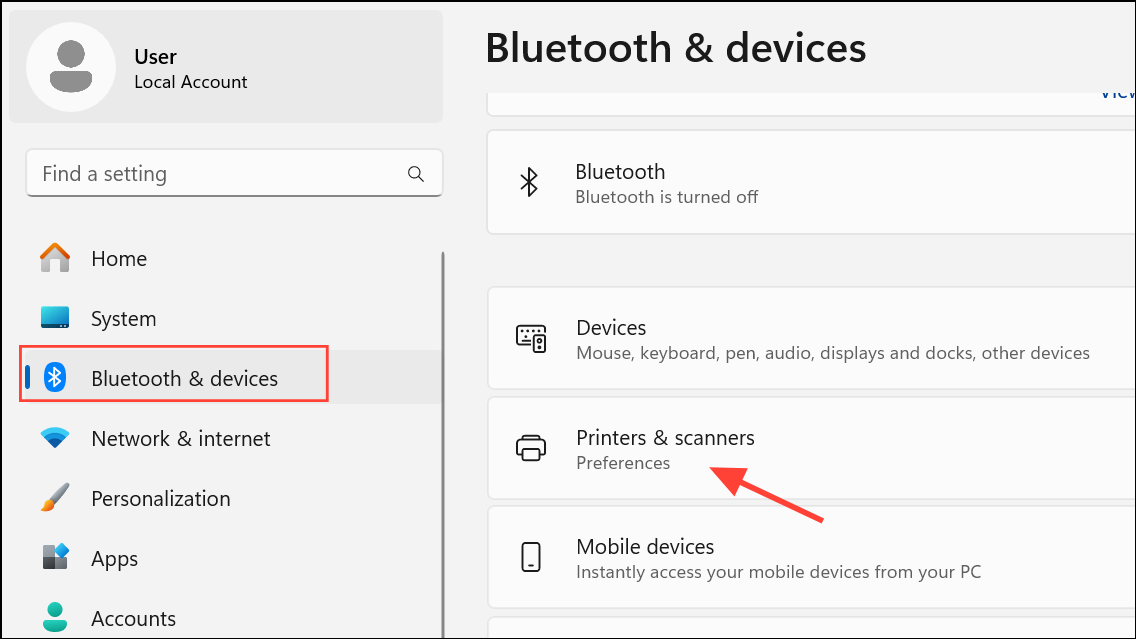
4- Reinstall the Driver: Download the latest UFR II driver from the Canon support website and install it, following the instructions in the first solution. If needed, re-add your printer through Settings > “Bluetooth & devices” > “Printers & scanners.”
Conclusion:
By methodically following these troubleshooting steps, you can effectively conquer the Canon printer Error 853 on Windows 11. From ensuring the correct driver installation and disabling Secure Print, to utilizing Windows’ built-in tools, you’ll be back to printing smoothly in no time. Should these solutions fail, consider checking for firmware updates for your printer or reaching out to Canon support for further assistance.
And if you'd like to go a step further in supporting us, you can treat us to a virtual coffee ☕️. Thank you for your support ❤️!

We do not support or promote any form of piracy, copyright infringement, or illegal use of software, video content, or digital resources.
Any mention of third-party sites, tools, or platforms is purely for informational purposes. It is the responsibility of each reader to comply with the laws in their country, as well as the terms of use of the services mentioned.
We strongly encourage the use of legal, open-source, or official solutions in a responsible manner.
Comments