Windows 11 users, have you encountered the frustrating error code 0x800f0991 during a Windows Update? This hiccup can stall crucial security patches and feature updates, leaving your system vulnerable and outdated. Don’t worry – this guide provides clear, actionable solutions to banish this error and get your updates flowing smoothly again. Let’s dive in and reclaim control of your Windows 11 experience!
Understanding the Culprit: Why Error 0x800f0991 Appears
Error code 0x800f0991 typically signals an issue with your Windows Update process. The root causes can be diverse, including:
- Missing or Corrupted System Files: Essential files required for updates may be damaged or absent.
- Corrupted Update Components: The very mechanisms that deliver and install updates could be malfunctioning.
- Conflicts with Applications: Certain programs may interfere with the update process.
- Incomplete Downloads: The update files may not have downloaded properly.
Fortunately, several proven methods can address these underlying issues and restore your system’s ability to update.
Solution 1: Perform an In-Place Upgrade for a Fresh Start
An in-place upgrade essentially reinstalls Windows 11 while preserving your files, apps, and settings. It’s like giving your operating system a fresh coat of paint without losing anything important.
Here’s how to do it:
- Download the Latest ISO: Visit the official Microsoft website or utilize a reputable tool to obtain the latest Windows 11 ISO file. This ISO will contain the most up-to-date version, including the latest cumulative updates.
- Preparation is Key: Disconnect any external devices, except your keyboard, mouse, and network cable. If you have third-party antivirus software, temporarily disable it to prevent potential conflicts.
- Mount and Run Setup: Right-click the ISO file and select “Mount.” Open the mounted drive and run the “setup.exe” file.
- Follow the Prompts: Carefully follow the on-screen instructions. Ensure you choose the option to keep your files and applications.
- Patience is a Virtue: The upgrade process may involve multiple restarts and can take some time. Allow it to complete without interruption.
- Verify the Fix: Once the upgrade is finished, check for Windows Updates again. The error should be gone, and updates should install successfully.
Solution 2: Reset Windows Update Components
Corrupted Windows Update components can wreak havoc on your system. Resetting these components forces Windows to rebuild the update-related services and folders, often resolving update issues.
Here’s the process:
1- Open Command Prompt as Administrator: Search for “cmd” in the Start menu, right-click “Command Prompt,” and select “Run as administrator.”

2- Stop Essential Services: Type the following commands one at a time and press Enter after each:
net stop wuauserv
net stop cryptSvc
net stop bits
net stop msiserver
3- Rename Update Storage Folders: Enter these commands, pressing Enter after each: ren C:\Windows\SoftwareDistribution SoftwareDistribution.old ren C:\Windows\System32\catroot2 catroot2.old
4- Restart the Services: Type the following commands one by one, pressing Enter after each:
net start wuauserv
net start cryptSvc
net start bits
net start msiserver
5- Restart and Test: Close Command Prompt and restart your computer. Try running Windows Update again to see if the issue is resolved.
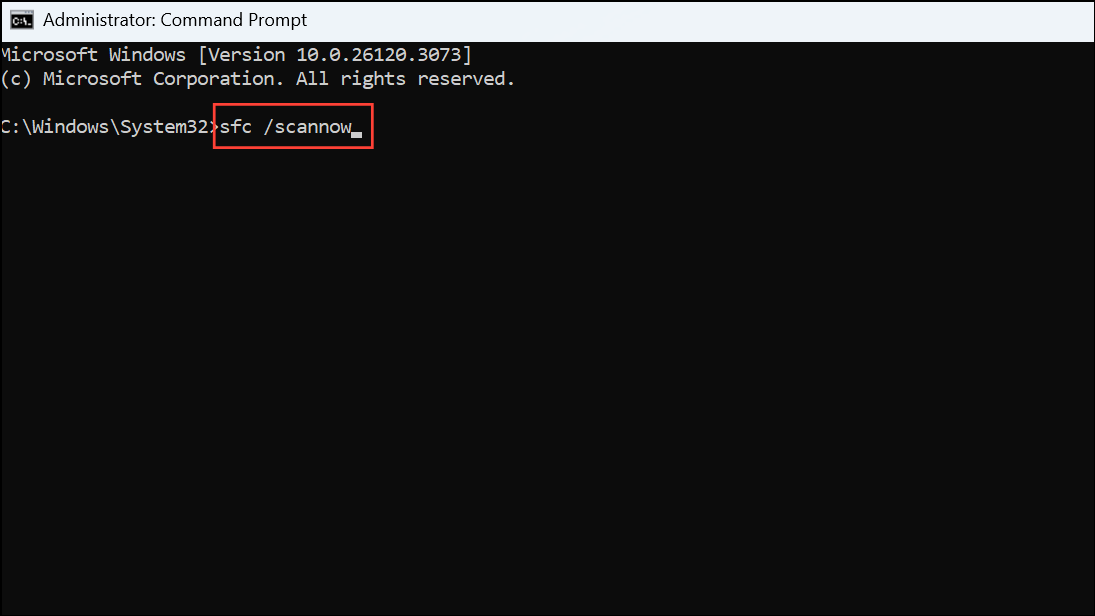
Solution 3: Run System File Checker and DISM Tools
System File Checker (SFC) and the Deployment Imaging Service and Management Tool (DISM) are powerful built-in utilities that can repair corrupted system files and the Windows component store, which are common culprits behind update errors.
Here’s how to use them:
1- Open Command Prompt as Administrator: Open Command Prompt with administrator privileges (as described above).
2- Run System File Checker: Type the following command and press Enter: sfc /scannow Allow the scan to complete. It will identify and attempt to repair corrupted or missing system files.
3- Use DISM Tools: Execute these commands in order, pressing Enter after each one: DISM /Online /Cleanup-Image /CheckHealth DISM /Online /Cleanup-Image /ScanHealth DISM /Online /Cleanup-Image /RestoreHealth These commands will check for corruption, scan the system image, and attempt to repair it.
4- Restart and Recheck: Once the DISM commands are finished, restart your computer and then try running Windows Update again.
Solution 4: Manually Install Updates (As a Last Resort)
If automatic updates continue to fail, you can manually download and install the update package. This can sometimes bypass issues related to incomplete downloads or catalog mismatches.
Here’s how:
- Visit the Microsoft Update Catalog: Go to the Microsoft Update Catalog (https://www.catalog.update.microsoft.com/).
- Search for the Specific Update: Search for the specific update that’s failing (e.g., KB5036893 or KB5053598).
- Download the Correct Version: Download the update that matches your Windows version and system architecture (x64 or ARM64).
- Run the Installer: Double-click the downloaded file to run the installer. Follow the prompts to complete the installation.
- Restart and Verify: Restart your computer if prompted, and then check if the update is now listed as installed.
Extra Steps and Important Considerations
- Check Essential Services: Ensure services like Windows Update, Windows Installer, and Background Intelligent Transfer Service are running. You can manage these through the “services.msc” console.
- Backup Before Modifying Folders: If you encounter permissions issues with folders like
C:\Program Files\WindowsApps, make a complete backup before making any changes. - Disk Cleanup Caution: Disk cleanup utilities may not always remove all update remnants. Focus on the repair methods outlined above.
- Fresh Installation (If Necessary): If all other methods fail, a fresh installation of Windows 11, using the latest ISO, might be the only solution. Choose the option to keep your files and applications to minimize data loss.
Conclusion:
Error 0x800f0991 can be a nuisance, but with these troubleshooting steps, you can effectively address the underlying causes and restore your Windows 11 system’s update functionality. By implementing these solutions, you’ll keep your system secure, stable, and equipped with the latest features. Don’t let update errors hold you back—take control and ensure your Windows 11 experience remains smooth and up-to-date!
And if you'd like to go a step further in supporting us, you can treat us to a virtual coffee ☕️. Thank you for your support ❤️!

We do not support or promote any form of piracy, copyright infringement, or illegal use of software, video content, or digital resources.
Any mention of third-party sites, tools, or platforms is purely for informational purposes. It is the responsibility of each reader to comply with the laws in their country, as well as the terms of use of the services mentioned.
We strongly encourage the use of legal, open-source, or official solutions in a responsible manner.
Comments