
Is your Windows 11 screen stubbornly refusing to turn off, even after you’ve set the perfect idle time? This frustrating issue, disrupting your workflow and potentially wasting energy, is a common problem. But don’t worry! This comprehensive guide provides a clear, step-by-step approach to diagnosing and resolving display timeout failures, ensuring your screen respects your power management preferences. Let’s dive in and get your display behaving properly!
Why Your Windows 11 Screen Won’t Turn Off
Several factors can prevent your screen from entering sleep mode. These include conflicting software, active background processes, problematic device drivers, and misconfigured power settings. We’ll systematically address each potential cause, offering practical solutions to restore your display timeout functionality.
1. Take Control with Command Line Power Settings
Sometimes, the simplest solutions are the most effective. Using the command line allows you to directly manipulate your display timeout settings, often bypassing the graphical interface issues.
Step 1: Open Elevated Command Prompt: Press Win + X and select “Terminal (Admin)” or “Command Prompt (Admin)”.

Step 2: Set Plugged-In Timeout: To set the display timeout while plugged in, use this command, replacing 10 with your desired timeout in minutes: powercfg -change -monitor-timeout-ac 10

Step 3: Adjust Battery Timeout: For laptops or devices running on battery, use this command: powercfg -change -monitor-timeout-dc 5 These commands directly influence the system’s display timeout behavior. Many users report that after using these commands, their chosen timeout values are consistently applied, even after reboots.

2. Identify and Eliminate Screen-Keeping Devices and Applications
Certain hardware and software actively prevent your system from idling. Let’s pinpoint these culprits.
Step 1: Open Elevated Command Prompt: As before, use Win + X and select “Terminal (Admin)” or “Command Prompt (Admin)”.
Step 2: Check for Active Requests: Run the following command to list processes blocking the display from turning off: powercfg -requests

Step 3: Review the Output: Examine the output for entries under “DISPLAY” or “SYSTEM”. If specific applications or devices are listed, they are preventing the timeout.
Step 4: Disable Problematic Devices or Applications: Close identified applications or disconnect devices. Common offenders include:
- USB peripherals (joysticks, external keyboards, webcams)
- Media players
- Background utilities
Step 5: Proceed if No Requests are Listed: If the powercfg -requests command doesn’t reveal anything, continue with the next troubleshooting steps.
3. Update Your Graphics Card Drivers and Firmware
Outdated or corrupted graphics drivers can interfere with display power management.
Step 1: Download the Latest Drivers: Visit your graphics card manufacturer’s website (NVIDIA, AMD, or Intel) and download the most recent drivers for your GPU model.
Step 2: Install the Drivers and Restart: Install the new drivers, and restart your computer to ensure the changes take effect.
Step 3: Consider Firmware Updates (NVIDIA): NVIDIA users might need to update their GPU firmware. Download the necessary firmware update tool from NVIDIA’s support site and follow their instructions. Updating drivers and firmware can fix issues where the system struggles to signal the display to enter sleep mode.
4. Reconfigure and Reset Your Power Settings
A simple reset of your power plan can often resolve the issue.
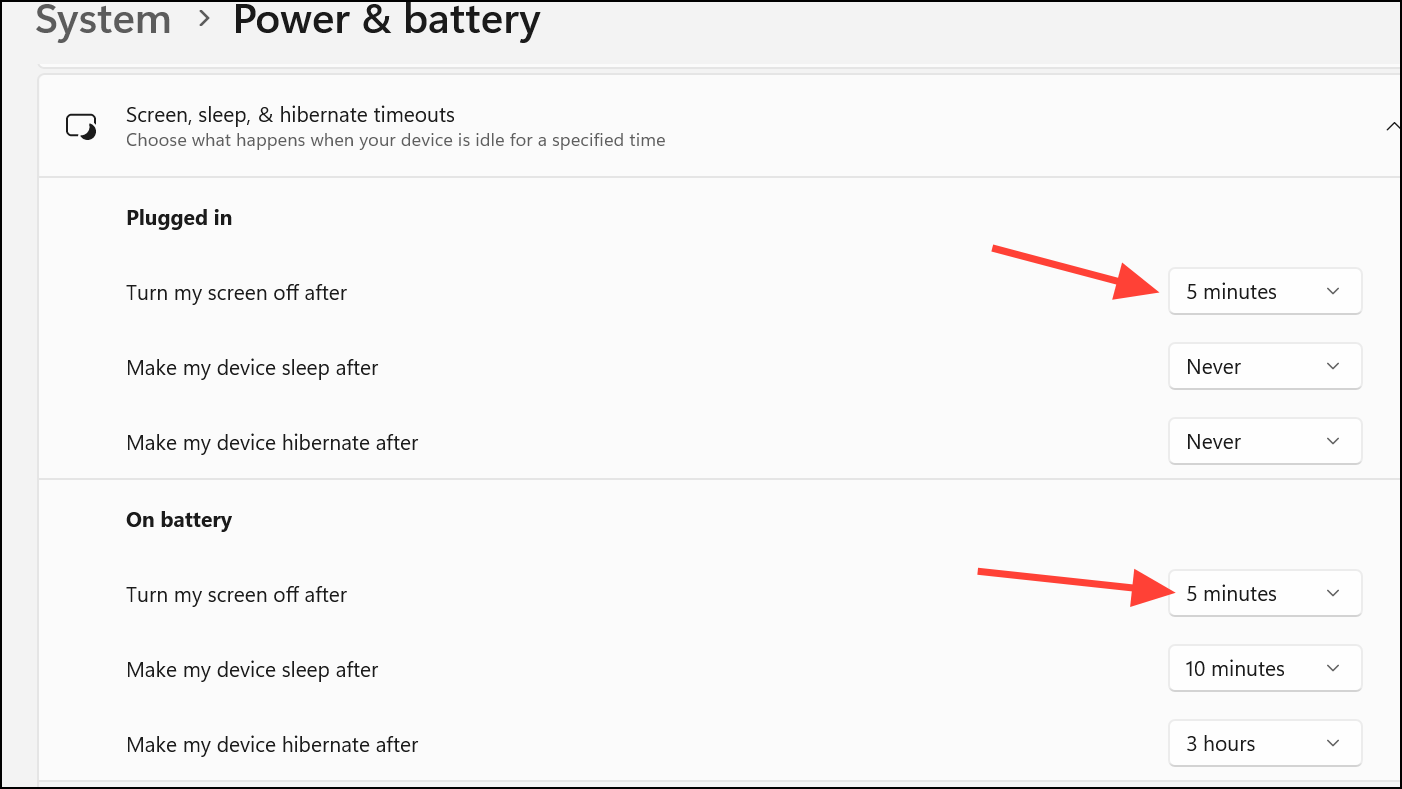
Step 1: Access Display Settings: Open Settings by pressing Win + I, then go to “System” > “Power & battery” > “Screen, Sleep, and Hibernate Timeouts”.

Step 2: Adjust Timeouts: Adjust the “Turn off my screen after” settings for both battery and plugged-in modes to your preferred values.
Step 3: Open Control Panel: Press Win + R, type control, and navigate to “System and Security” > “Power Options.”

Step 4: Restore Default Settings: Click “Change plan settings” for your active power plan, then click “Restore default settings for this plan.”

Step 5: Save and Test: Save your changes and observe if the display now turns off as configured.
5. Disconnect and Reconnect External Devices for a Fresh Start
Peripheral devices can sometimes interfere with power management.
Step 1: Power Down: Shut down your PC completely.
Step 2: Unplug Everything: Disconnect all USB devices, video cables, and the power cable.
Step 3: Discharge Residual Power: Press and hold the power button for 10 seconds.
Step 4: Reconnect in Order: Wait 10 minutes, then reconnect the video cable, followed by USB devices, and lastly, the power cable.
Step 5: Power Up and Test: Power on your PC and verify if the display now turns off after the set idle period. This process can reset certain hardware states that might be interfering with your power management.
6. Identify and Shut Down Interfering Background Processes
Background applications, such as media players, hardware monitoring tools, and security software, can prevent the system from idling.
Step 1: Perform a Clean Boot: Run msconfig, go to the “Services” tab, check “Hide all Microsoft services,” and click “Disable all.” Then, go to the “Startup” tab in Task Manager and disable all startup programs. Restart your computer.

Step 2: Test the Timeout: Check if the display timeout is working now. If it is, re-enable services and startup programs one by one to identify the culprit.
Step 3: Check Specific Applications: Pay special attention to utilities like Malwarebytes, CCleaner, or media players that might be running in the system tray, as these are commonly reported to interfere with display timeouts.
7. Update Your BIOS and Review Power Management Settings
Outdated BIOS firmware can sometimes cause compatibility issues.
- Step 1: Access BIOS/UEFI: During boot, enter your system’s BIOS or UEFI firmware (usually by pressing Del, F2, or another key).
- Step 2: Review Power Settings: Look for power management options related to sleep, wake, or USB devices. Ensure the settings are configured to allow the system to enter low-power states and turn off the display.
- Step 3: Update BIOS (If Available): If a BIOS update is available from your system or motherboard manufacturer, follow their instructions carefully to update the firmware.
8. Advanced Troubleshooting: System File Checks and Repair Install (Last Resorts)
If the above steps fail, consider these advanced solutions.
Step 1: System File Check: Open an elevated Command Prompt and run: sfc /scannow This will scan for and repair corrupted system files.

Step 2: Repair Install (In-Place Upgrade): Download the latest Windows 11 ISO from Microsoft, mount it, and run setup.exe. Choose to keep your files and apps. This will repair Windows without deleting your data.
Conclusion:
By systematically working through these solutions, you can regain control of your Windows 11 display timeout settings. Troubleshooting display timeout issues often involves a combination of adjusting power settings, updating system components, and carefully checking for device or software conflicts. Regularly reviewing connected devices and keeping your system’s firmware current can help prevent future interruptions to your display power management. Now, enjoy a screen that goes to sleep when you want it to, conserving energy and protecting your display!
And if you'd like to go a step further in supporting us, you can treat us to a virtual coffee ☕️. Thank you for your support ❤️!

We do not support or promote any form of piracy, copyright infringement, or illegal use of software, video content, or digital resources.
Any mention of third-party sites, tools, or platforms is purely for informational purposes. It is the responsibility of each reader to comply with the laws in their country, as well as the terms of use of the services mentioned.
We strongly encourage the use of legal, open-source, or official solutions in a responsible manner.
Comments