Encountering an unwelcome white dot, or even multiple, on your crisp Windows 11 screen can be incredibly disruptive. These pesky visual anomalies can obscure vital information, break your immersion, and immediately spark concern about your system’s health. Whether they appear within a specific application, persist across your entire desktop, or even show up during startup, addressing them promptly is key to restoring your display’s clarity and your peace of mind.
This comprehensive guide will walk you through systematic troubleshooting steps to diagnose and resolve white dot issues on your Windows 11 device. We’ll help you differentiate between software glitches, graphics driver conflicts, and potential hardware malfunctions, empowering you to tackle the problem effectively.
Pinpointing the Culprit: Hardware, Software, or Driver?
Before diving into solutions, it’s crucial to understand the origin of these white dots. Their behavior and appearance offer critical clues:
- Early Bird or Late Bloomer? Restart your computer. Do the white dots appear immediately during the boot process (e.g., on the manufacturer’s logo screen or within the BIOS/UEFI setup utility) before Windows even loads? If so, it strongly suggests a hardware-related problem. If they only emerge after Windows has fully loaded, the issue is likely rooted in software or display drivers.
- App-Specific or System-Wide? Observe if the dots are confined to particular applications (like a browser, a game, or a productivity tool such as Microsoft Teams or Grammarly) or if they are visible regardless of what programs you have open. Dots limited to specific apps often point to software conflicts or background processes.
- Interactive or Static? Try moving your mouse cursor directly over the white dot. Does the cursor change shape (e.g., to a text input caret, a resizing arrow, or a hand pointer)? If it does, the “dot” might not be a display defect at all, but rather a tiny, transparent, or misrendered interactive element from a running application, widget, or notification.
Based on your observations, you can proceed to the most relevant troubleshooting methods below.
Method 1: Taming Transient Dots – Addressing Application-Induced White Spots
Many users report white dots appearing due to specific background applications or desktop widgets, especially after recent software updates. Programs like the new Microsoft Teams, Steam, Grammarly, or customization tools like Rainmeter are common culprits.
1- Summon the Task Manager: Press Ctrl + Shift + Esc simultaneously to open Task Manager.
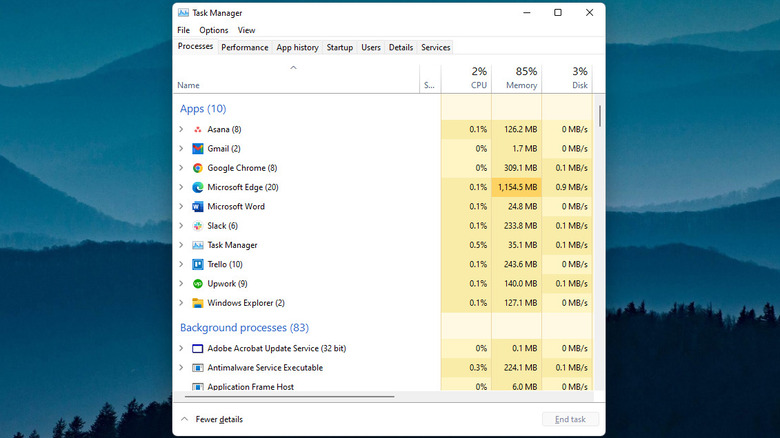
2- Scrutinize Running Processes: Carefully review the “Processes” tab. Look for applications that are actively running, especially those known to cause display artifacts (e.g., “Microsoft Teams (new),” “Grammarly,” “Rainmeter,” “Steam”). Also, consider any recently installed utilities or applications that run in the background.
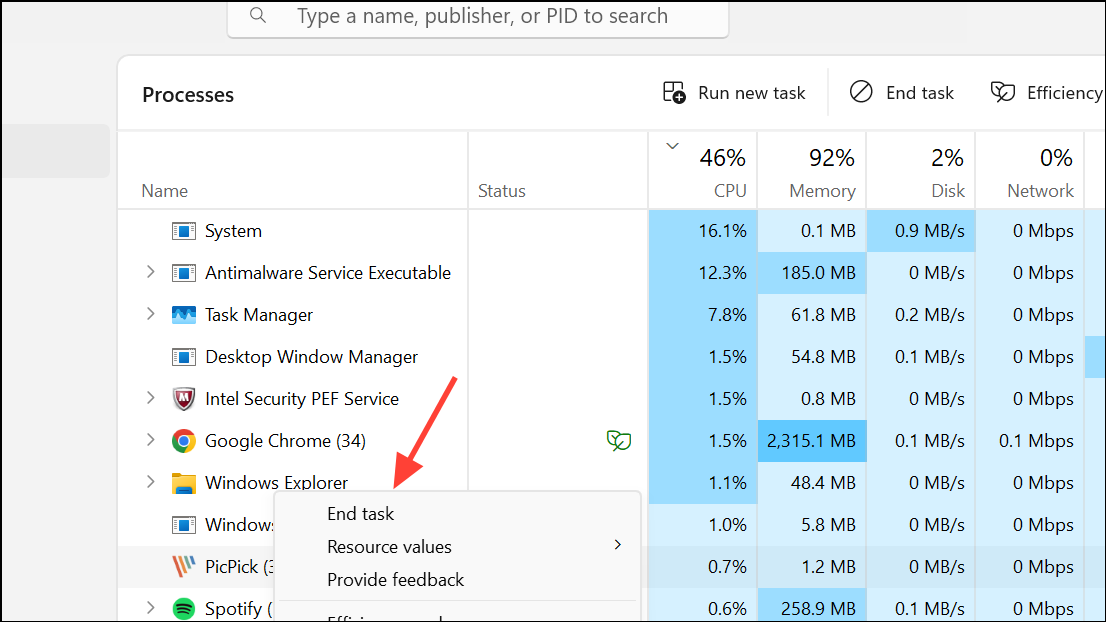
3- Isolate the Offender: Right-click on a suspected application or background process and select End Task. Immediately observe your screen to see if the white dot vanishes. Repeat this for other suspicious processes until the dot disappears.
4- Long-Term Solutions:
If you identify the problematic application, check for available updates, as developers often release fixes for such visual bugs.
Consider disabling its auto-start setting (often found in the app’s settings or within Task Manager’s “Startup” tab) to prevent it from launching with Windows.
If the app isn’t essential, you might choose to uninstall it.
For Microsoft Teams users, some have reported success by switching to dark mode or reverting to an older client version if possible.
5- Rainmeter Specifics: If you use Rainmeter, open its interface and disable individual skins or widgets one by one to pinpoint the exact one causing the issue.
Method 2: Revitalizing Your Display Drivers – Solving Driver-Related Anomalies
Corrupted, outdated, or incompatible display drivers are a frequent cause of various screen anomalies, including white dots, particularly after Windows updates or when using certain graphics cards.
1- Access Device Manager: Right-click the Start button (the Windows icon) and select Device Manager from the context menu.

2- Locate Display Adapters: Expand the Display adapters section to reveal your graphics card(s).
3- Update Your Driver: Right-click on your primary graphics card (e.g., NVIDIA, AMD Radeon, Intel Iris Xe) and choose Update driver. Select Search automatically for drivers and follow the on-screen prompts.

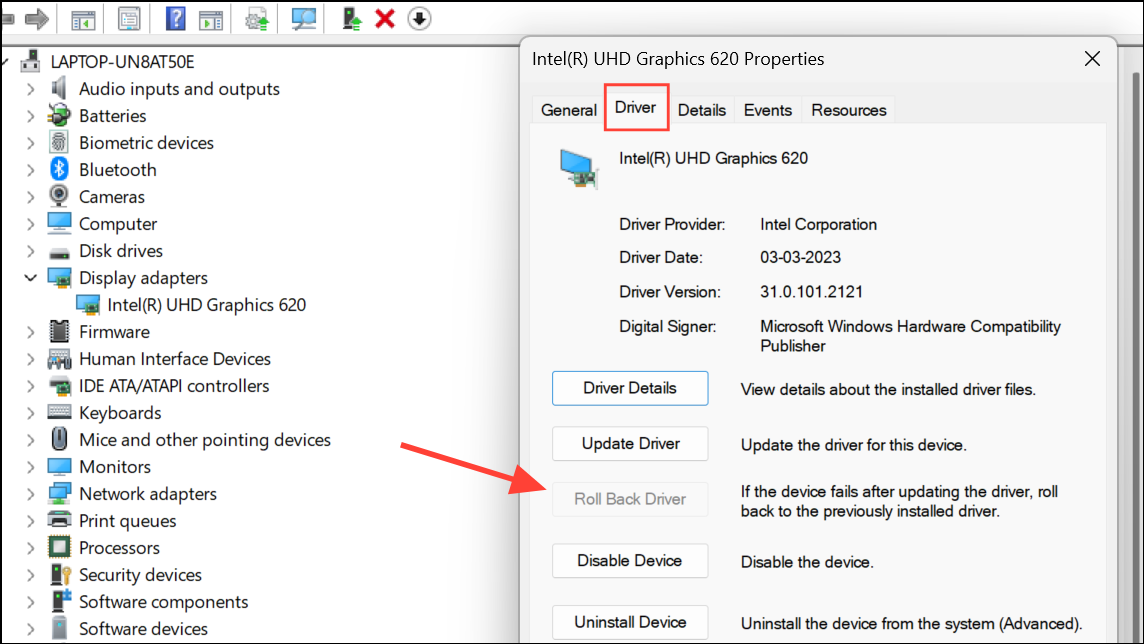
4- Roll Back (If Applicable): If updating doesn’t help or if the issue appeared after a recent driver update, try rolling back. Right-click the display adapter, select Properties, go to the Driver tab, and click Roll Back Driver if the option is available. This will revert to a previous working version.
5- Clean Reinstallation (Advanced): For persistent issues, a complete clean reinstallation of your display drivers is highly recommended.
- Download the latest official drivers directly from your graphics card manufacturer’s website (NVIDIA, AMD, or Intel).
- Consider using a dedicated tool like Display Driver Uninstaller (DDU) in Windows Safe Mode to thoroughly remove all traces of old drivers.
- Reboot your PC and install the freshly downloaded drivers.
6- Restart and Verify: After any driver update or reinstallation, restart your computer and check if the white dots are gone.
Method 3: Minor Tweaks – Adjusting Display Parameters
Sometimes, subtle changes to your display settings can help resolve or mask rendering quirks that manifest as white dots, especially those related to software rendering.
1- Navigate to Display Settings: Press Windows key + I to open Settings, then go to System > Display.
2- Adjust Visuals: Experiment with the Brightness, Contrast, and Color settings. Sometimes, lowering brightness slightly or tweaking color profiles can make very faint artifacts less noticeable.
3- Resolution Refresh: Temporarily change your display resolution to a lower setting (e.g., 1024×768 or 1280×800), apply the change, then revert to your original, recommended resolution. Some users have reported this action causes stubborn white dots to disappear until the next system restart.
Method 4: Investigating Hardware Anomalies – When the Screen Itself is the Issue
If the white dots persist through all software and driver troubleshooting, especially if they are visible in the BIOS/UEFI screen, it’s highly probable you’re dealing with a hardware defect on the display panel itself.
- BIOS Confirmation: Reboot your PC and enter your BIOS/UEFI setup by pressing the designated key (commonly F2, F10, DEL, or ESC) repeatedly during startup. If the white dots are present here, they are indeed hardware-related.
- Addressing Stuck or Dead Pixels:
- Gentle Massage: For a single, tiny white dot (a stuck pixel), you can try gently massaging the affected area with a soft, lint-free cloth or cotton swab. Apply very light pressure, not too much, as you don’t want to damage the screen further. This can sometimes “unstick” a pixel.
- Pixel Fixing Software: Utilize online tools or software designed to “fix” stuck pixels, such as JScreenFix. These tools rapidly cycle colors on the affected area, which can sometimes reactivate the sub-pixels.
- Larger White Patches: If the anomaly is a larger, irregular white patch rather than a distinct pixel, it might indicate pressure damage to the LCD panel or a problem with the display’s backlight diffuser.
- Professional Repair or Replacement: In cases of permanent hardware damage like dead pixels (pixels that remain off, showing black, or pixels that are permanently stuck on a specific color) or backlight issues, the only definitive solution is professional repair or screen replacement. If your device is still under warranty, contact the manufacturer or vendor for service options.
Conclusion
The appearance of white dots on your Windows 11 display can be frustrating, but armed with the right troubleshooting steps, you can often resolve the issue without resorting to costly repairs. Most frequently, the culprits are easily remedied by identifying and addressing problematic background applications, updating or reinstalling graphics drivers, or making minor adjustments to display settings. In those rarer instances where hardware is the cause, at least you’ll have a clear diagnosis, enabling you to make informed decisions about repair or replacement. Regular system updates and mindful management of installed applications can help prevent similar display woes from returning, ensuring your Windows 11 experience remains clear, crisp, and uninterrupted.
And if you'd like to go a step further in supporting us, you can treat us to a virtual coffee ☕️. Thank you for your support ❤️!

We do not support or promote any form of piracy, copyright infringement, or illegal use of software, video content, or digital resources.
Any mention of third-party sites, tools, or platforms is purely for informational purposes. It is the responsibility of each reader to comply with the laws in their country, as well as the terms of use of the services mentioned.
We strongly encourage the use of legal, open-source, or official solutions in a responsible manner.
Comments