
In an increasingly digital landscape where managing server roles and features is paramount, Remote Server Administration Tools (RSAT) serve as an invaluable resource for IT professionals. With the advent of Windows 11, installing RSAT has evolved, providing a more integrated and streamlined approach. This guide explores the installation methods available for Windows 11 and offers troubleshooting tips to help you navigate any potential hurdles you may encounter along the way.
What Are Remote Server Administration Tools (RSAT)?
RSAT is a suite of tools designed to enable administrators to manage Windows Server roles and features directly from their workstation, eliminating the need for remote desktops or direct server access. This set of tools is crucial for efficient system management, allowing for a seamless setup of services such as Active Directory, DNS, and more.
How to Install RSAT on Windows 11
Method 1: Installing RSAT via Windows 11 Settings
RSAT is integrated into Windows 11 as optional features, making it user-friendly for most administrators. However, it’s essential to note that RSAT is only available on Windows 11 Professional, Enterprise, and Education editions.
Step-by-Step Installation:
1- Accessing Settings: Press Windows + i to open the Settings app or search for “Settings” in the Start menu.
2- Navigating to Optional Features: From the sidebar, click on System, then scroll down to select Optional features. If the option is not visible, utilize the search function for accurate navigation.

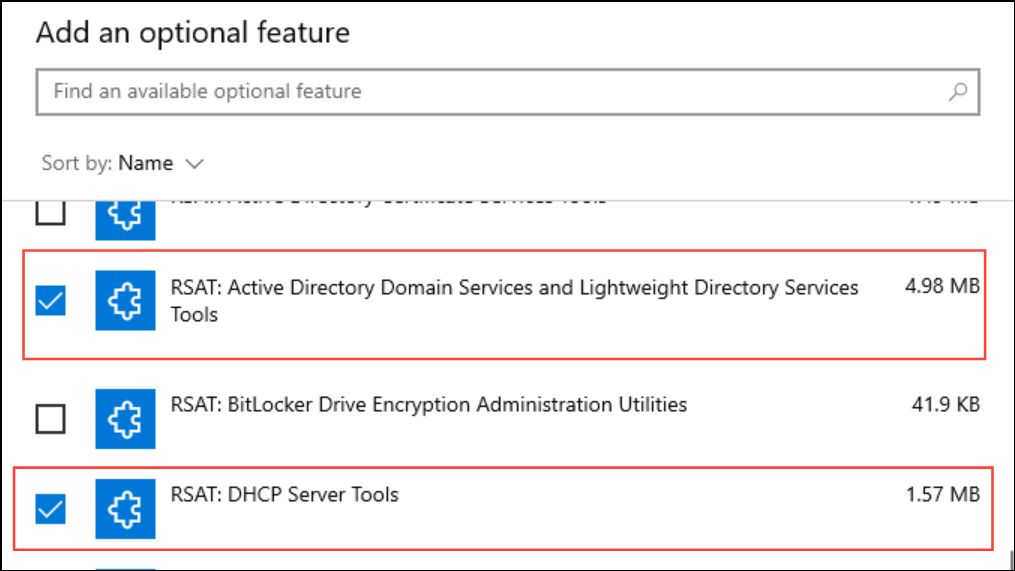
3- Viewing Features: Click on View features or Add an optional feature, leading you to a searchable list of available features.

4- Searching for RSAT: In the search bar, type “RSAT” to see a selection of RSAT tools, including “RSAT: Active Directory Domain Services and Lightweight Directory Services Tools,” among others.
5- Selecting Tools: Check the boxes of the RSAT components you wish to install. For instance, to install Active Directory Users and Computers, select “RSAT: Active Directory Domain Services and Lightweight Directory Services Tools.”
6- Installation Process: Click Next, review your selections, and then hit Install. You can check the installation progress in the Optional features section under “Recent actions.”
7- Accessing RSAT Tools: After installation, locate RSAT tools by searching in the Start menu (e.g., “Active Directory Users and Computers”) or access them via Windows Tools.
Method 2: Installing RSAT Using PowerShell
For advanced users or those managing multiple systems, PowerShell provides a powerful alternative for installing RSAT.
Steps to Install RSAT Using PowerShell:
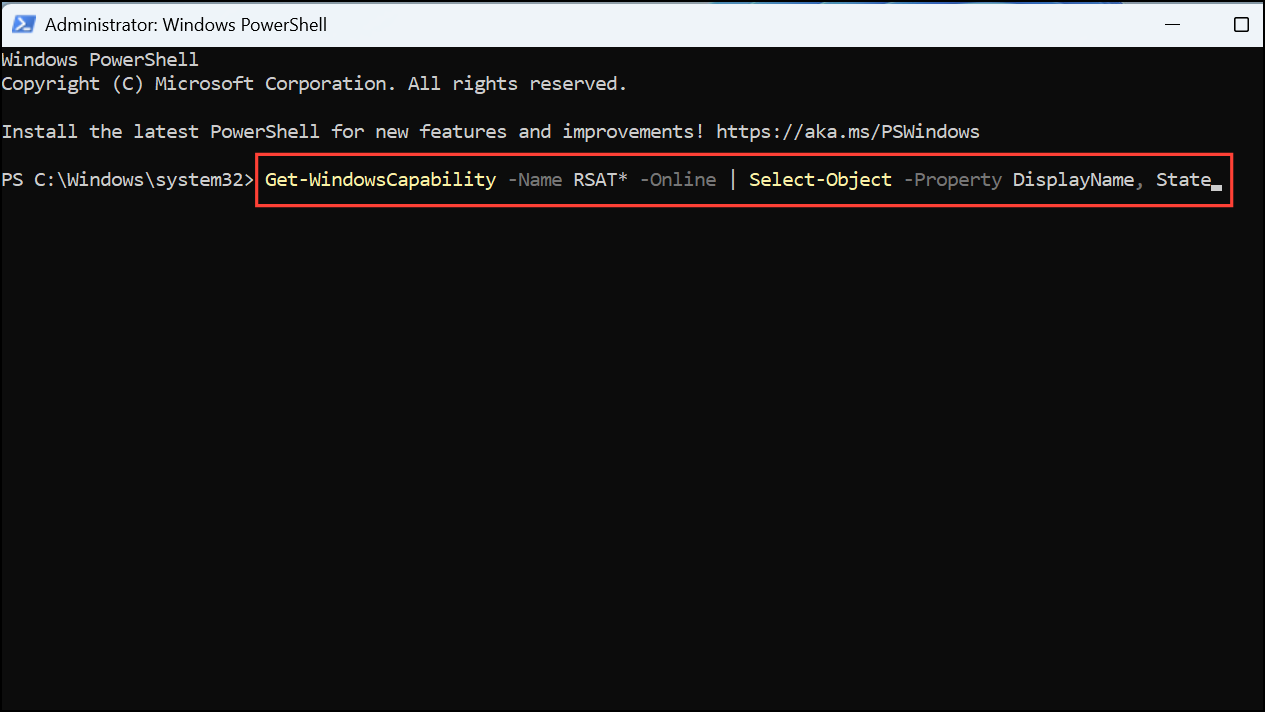
1- Launching PowerShell: Search for “PowerShell” in the Start menu, right-click it, and select Run as administrator.

2- Listing RSAT Features: Execute the following command to see all available RSAT features and their installation status: 1Get-WindowsCapability -Name RSAT* -Online | Select-Object -Property DisplayName, State
3- Installing a Specific RSAT Tool: To install a particular RSAT tool, use: 1Add-WindowsCapability -Online -Name "Rsat.ActiveDirectory.DS-LDS.Tools~~~~0.0.1.0"

4- Installing All RSAT Tools: To install all RSAT components, run: 1Get-WindowsCapability -Name RSAT* -Online | Add-WindowsCapability -Online

This command queues every available RSAT tool for installation. You can monitor the process within the Optional features section or directly in PowerShell.
Method 3: Installing RSAT Offline Using Features on Demand (FoD) Media
In environments without internet access or those utilizing Windows Server Update Services (WSUS), RSAT installation may require an offline method using Features on Demand (FoD).
Steps for Offline Installation:
1- Download FoD ISO: Acquire the appropriate Features on Demand ISO for your Windows 11 version from the Volume Licensing Service Center or the Microsoft language pack and features download page.
2- Mount the ISO: Right-click the downloaded ISO file and select Mount.
3- Open PowerShell as Administrator: Launch PowerShell with administrative privileges.
4- Running the Installation Command: Execute the following command to install a tool from the mounted ISO, substituting D: with the relevant drive letter for the mounted ISO: 1Dism.exe /online /add-capability /source:D: /capabilityname:Rsat.ActiveDirectory.DS-LDS.Tools~~~~0.0.1.0

Repeat this step or script the process for multiple RSAT tools as needed.
Troubleshooting Common RSAT Installation Issues
Despite these straightforward installation methods, challenges may arise. Here are solutions to common problems:
- Edition Restrictions: RSAT is not compatible with Windows 11 Home editions.
- Missing Optional Features Menu: If this menu is absent, ensure your account has local administrator rights. Use the search bar in Settings for accurate navigation.
- WSUS or Group Policy Restrictions: If the installation is blocked, altering the UseWUServer registry key to 0 may help, but check Group Policy permissions. For a direct installation, utilize FoD media.
- Domain Membership Errors: Unlinking from the domain, installing RSAT, and then rejoining the domain can sometimes resolve persistent installation failures.
- SCCM/MECM Conflicts: If you’re using Microsoft Endpoint Configuration Manager, consider removing the agent prior to RSAT installation and reinstalling it afterward.
Conclusion
Installing Remote Server Administration Tools (RSAT) on Windows 11 has never been more accessible, thanks to its integration as optional features within the operating system. Whether you opt for a graphical approach through Settings, leverage the power of PowerShell, or use offline methods, this guide serves as a roadmap to efficient server management. By familiarizing yourself with these installation techniques and troubleshooting tips, you can enhance your productivity and streamline administrative tasks.
By implementing these steps, you can maximize your server management capabilities within Windows 11, ensuring a smooth and efficient administrative experience.
And if you'd like to go a step further in supporting us, you can treat us to a virtual coffee ☕️. Thank you for your support ❤️!

We do not support or promote any form of piracy, copyright infringement, or illegal use of software, video content, or digital resources.
Any mention of third-party sites, tools, or platforms is purely for informational purposes. It is the responsibility of each reader to comply with the laws in their country, as well as the terms of use of the services mentioned.
We strongly encourage the use of legal, open-source, or official solutions in a responsible manner.
Comments