
Windows 11’s Windows Terminal is a powerful command-line interface, offering a sleek and versatile way to interact with your system through Command Prompt, PowerShell, WSL, and more. However, many tasks require administrator privileges, which is where running Windows Terminal as an administrator becomes crucial. This guide provides comprehensive instructions on how to launch Windows Terminal with elevated permissions, ensuring you have the access needed to configure, troubleshoot, and optimize your Windows 11 experience. Whether you’re a seasoned IT professional or a curious newcomer, this guide will equip you with the knowledge to unlock the full potential of Windows Terminal.
Why Run Windows Terminal as Administrator?
Running Windows Terminal as an administrator grants you the necessary permissions to execute commands that modify system settings, install software, and perform other advanced operations. Without administrator rights, you may encounter “access denied” errors, hindering your ability to complete tasks effectively. By launching the terminal with elevated privileges, you ensure that all shells—Command Prompt, PowerShell, and WSL—inherit these permissions, allowing you to work seamlessly.
Methods to Open Windows Terminal as Administrator
Here’s a breakdown of the various methods to launch Windows Terminal with administrator rights:
1. Using the Win+X Menu (Power User Menu)
1- Press the Windows key + X on your keyboard. This opens the Power User menu, a quick access point for essential system tools.

2- Select Terminal (Admin) or Windows Terminal (Admin) from the menu. The exact wording might vary based on your Windows 11 build. If you only see PowerShell (Admin), you can set Windows Terminal as your default terminal app in the settings.

3- When the User Account Control (UAC) prompt appears, click Yes to confirm. Windows Terminal will now launch with administrative privileges.
2. Through the Start Menu
1- Click the Start button or press the Windows key to open the Start menu.
2- Click All apps in the upper-right corner to view an alphabetical list of installed applications.

3- Scroll down to the “W” section and locate Windows Terminal (or just “Terminal”).
4- Right-click on the app, hover over More, and then select Run as administrator.

5- Confirm the UAC prompt by clicking Yes.
3. Utilizing Windows Search
1- Activate Windows Search by pressing Windows key + S or clicking the search icon in the taskbar.
2- Type terminal or windows terminal into the search field.
3- In the search results, right-click on Windows Terminal and choose Run as administrator. Alternatively, click the small arrow next to the app and select Run as administrator from the expanded options.
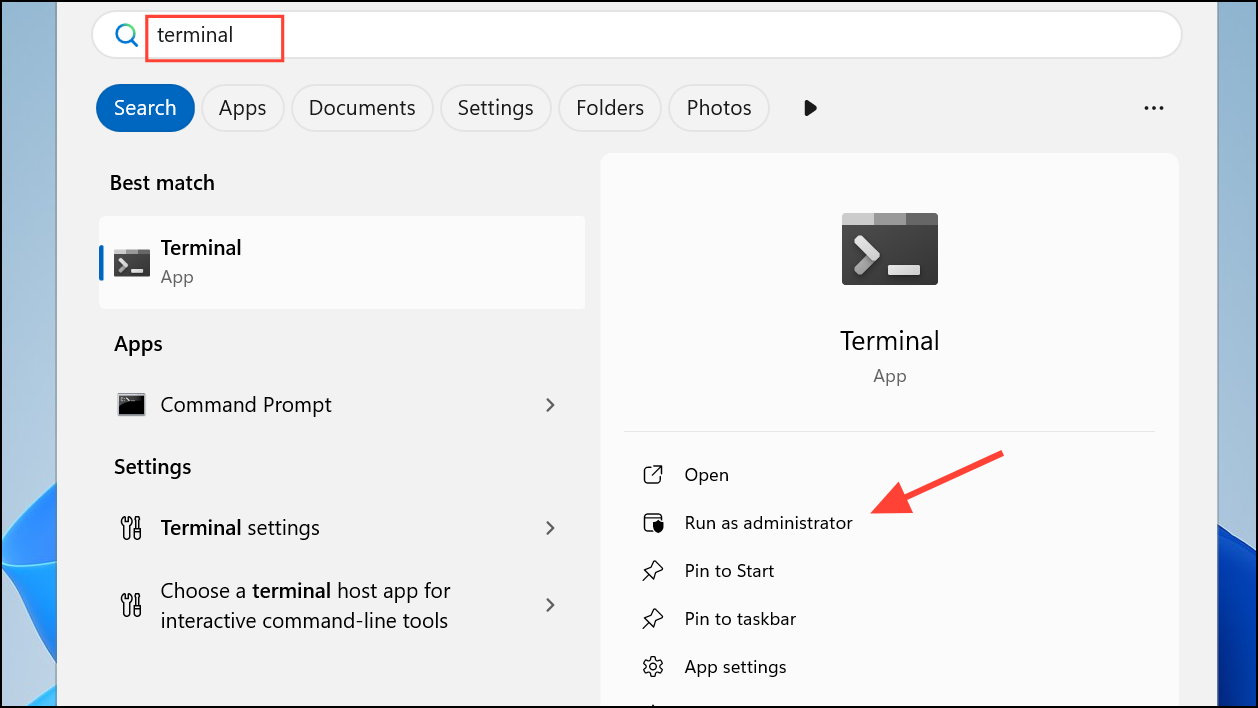
4- Approve the UAC prompt to proceed.
4. Leveraging the Run Dialog
1- Press Windows key + R to open the Run dialog box.
2- Type wt into the field.

3- Instead of clicking “OK,” hold down Ctrl + Shift and then press Enter or click “OK.” This instructs Windows to launch the command with administrator rights.
4- Accept the UAC prompt.
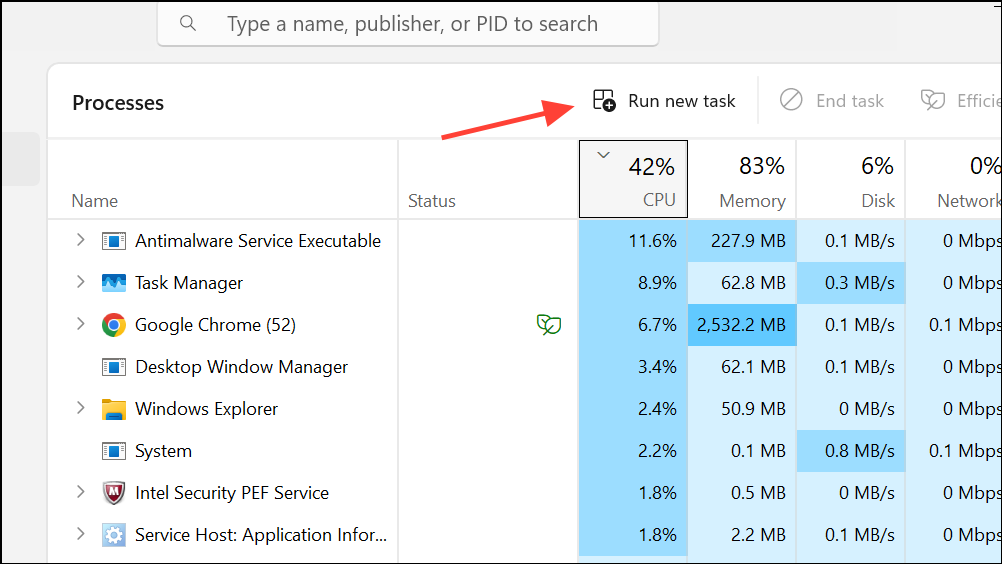
5. Employing Task Manager
1- Open Task Manager by pressing Ctrl + Shift + Esc or right-clicking the taskbar and selecting “Task Manager.”

2- In the menu bar, click File and select Run new task.
3- In the dialog box, enter wt.

4- Check the box labeled Create this task with administrative privileges before clicking “OK.” This guarantees Windows Terminal launches with elevated permissions.
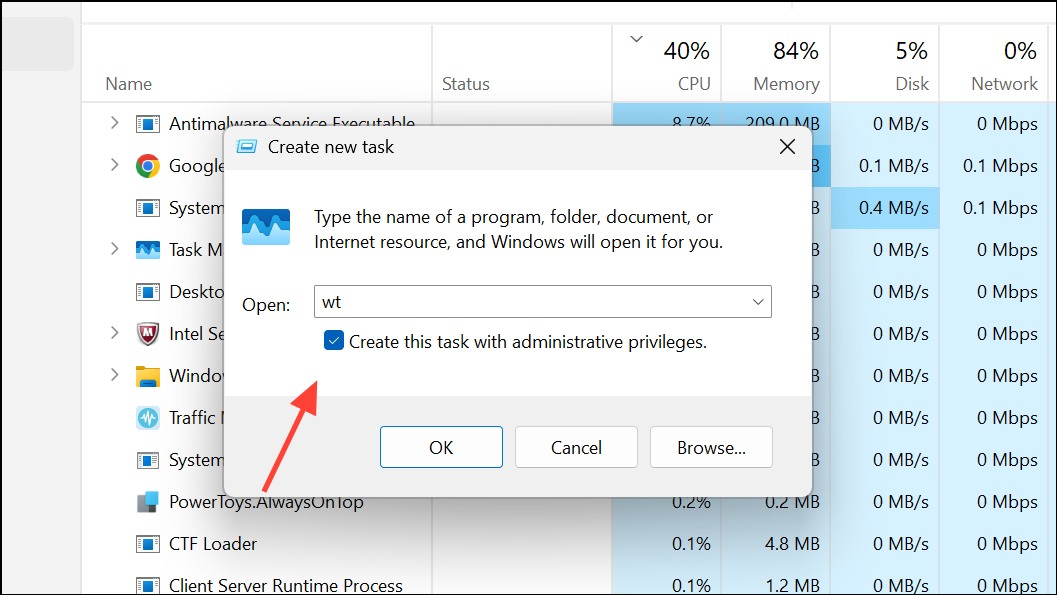
5- Respond to the UAC prompt.
6. Setting Windows Terminal to Always Run as Administrator (Recommended for frequent users)
For users who often need administrator access, configuring Windows Terminal to always start with elevated permissions is a time-saving measure.
1- Launch Windows Terminal using any of the previously described methods. Click the downward arrow in the title bar and select Settings, or press Ctrl + ,.

2- In the sidebar, select Defaults under the Profiles section.

3- Enable the option Run this profile as administrator. Now, every new Terminal window will launch with elevated permissions by default.

4- Optionally, set your preferred shell (like Command Prompt or PowerShell) as the default profile under Startup.
Alternative: Creating a Shortcut
You can create a shortcut for Windows Terminal on your desktop. Right-click the shortcut, go to Properties, click Advanced, and check the Run as administrator box.
Troubleshooting Common Issues
- UAC Prompt Not Appearing: Ensure User Account Control (UAC) is enabled in your Windows settings. Search for “UAC” in the Start menu.
- Terminal Opens Without Admin Rights: Double-check that you are selecting the “(Admin)” options and accepting the UAC prompt. Also, verify you haven’t disabled UAC.
- Default Terminal Issue: If you’re seeing PowerShell (Admin) instead of Terminal (Admin) in the Win+X menu, set Windows Terminal as the default terminal app in Settings > Personalization > Taskbar.
Conclusion
Mastering the art of opening Windows Terminal as an administrator is a crucial skill for any Windows 11 user who wants to delve deeper into system configuration and troubleshooting. By following the methods outlined above, you can easily access the elevated privileges needed to perform advanced tasks. Choose the method that best suits your workflow and enjoy the enhanced control and flexibility that comes with running Windows Terminal as an administrator. With these techniques, you’re well-equipped to optimize your Windows 11 experience and tackle any task that comes your way!
And if you'd like to go a step further in supporting us, you can treat us to a virtual coffee ☕️. Thank you for your support ❤️!

We do not support or promote any form of piracy, copyright infringement, or illegal use of software, video content, or digital resources.
Any mention of third-party sites, tools, or platforms is purely for informational purposes. It is the responsibility of each reader to comply with the laws in their country, as well as the terms of use of the services mentioned.
We strongly encourage the use of legal, open-source, or official solutions in a responsible manner.
Comments