
Are you staring at the frustrating “Windows could not update the computer’s boot configuration” error during your Windows 11 installation? This message can halt your upgrade in its tracks, but don’t panic! This guide will walk you through proven solutions to overcome this hurdle and get your new operating system up and running. We’ll explore the root causes and provide step-by-step instructions to get your Windows 11 installation back on track.
Rebuilding Your Boot Configuration: A Command Prompt Solution
The most common reason for this error is a problem with your system’s boot files. Fortunately, you can often fix this using the Command Prompt. Follow these steps to rebuild your boot configuration:
Boot from Installation Media: Start your computer from your Windows 11 installation USB drive. Choose your language and region when the setup screen appears. Instead of installing, select “Repair your computer.”
Access the Command Prompt: Navigate to Troubleshoot > Advanced options > Command Prompt. This opens the command-line interface within the Windows Preinstallation Environment (WinPE).

Identify and Assign a Drive Letter: Use diskpart to identify your system disk and EFI partition:
Type diskpart and press Enter.
Type list disk and press Enter. Note your system disk number (usually Disk 0, but double-check!).
Type select disk 0 (replace 0 with your disk number) and press Enter.
Type list partition and press Enter. Identify your EFI partition: Look for a partition around 100MB, formatted as FAT32.
Type select partition 2 (replace 2 with your EFI partition number) and press Enter.
Type assign letter=w and press Enter.
Type exit and press Enter to exit diskpart.

(Optional) Format the EFI Partition:Only if you suspect corruption or an empty EFI partition! Be careful, this will erase data.
Type format /FS:FAT32 w: and press Enter. Confirm if prompted.
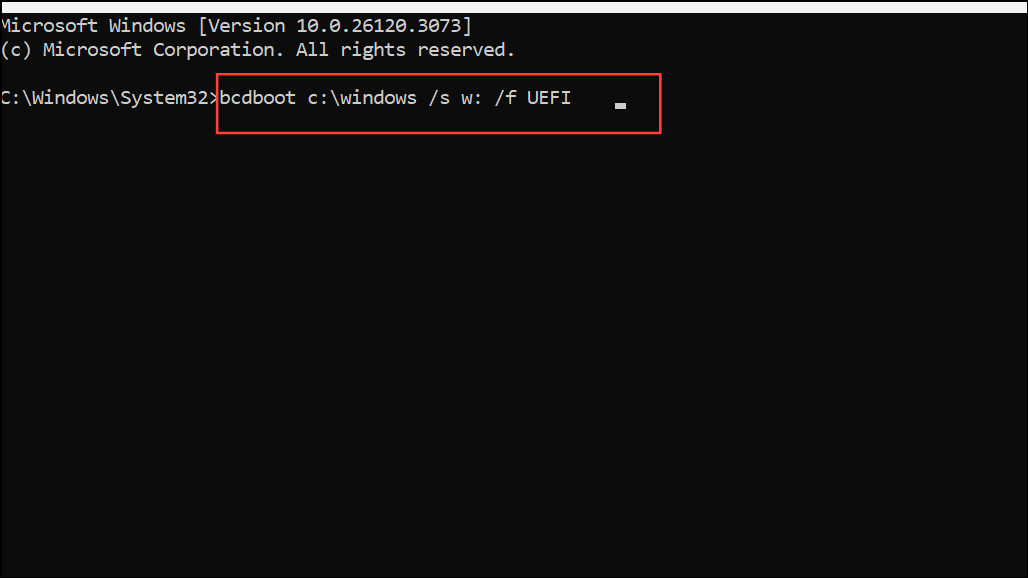
Recreate Boot Files: Use bcdboot to copy essential boot files.
Type bcdboot c:\windows /s w: /f UEFI and press Enter.
Rebuild the BCD: This command helps repair the Boot Configuration Data.
Type bootrec /rebuildbcd and press Enter.

Restart Your PC: Close the command prompt and restart your computer. The boot configuration should now be fixed!
BIOS/UEFI and Disk Partition Style: Ensuring Compatibility
Windows 11 requires specific settings in your BIOS/UEFI firmware and a particular disk partition style. Incorrect settings frequently cause boot configuration errors.
- Enter Your BIOS/UEFI: Immediately after turning on your computer, press the appropriate key (often Del, F2, F10, or Esc). Consult your motherboard or laptop manual for the specific key.
- Configure Boot Options:
- Set the boot mode to UEFI Only (not Legacy or CSM).
- Temporarily disable Secure Boot if you encounter further issues during installation. You can re-enable it after installation.
- Set the SATA controller mode to AHCI. Avoid RAID or IDE if possible.
- Save and Reboot: Save the changes you’ve made in the BIOS and restart your system from your Windows 11 installation media.
- Open Command Prompt (Again): When you reach the Windows Setup screen, press Shift + F10 to open the Command Prompt.
- Convert to GPT (Warning: Data Loss!): This step will erase all data on your system disk. Back up important files beforehand!
- Type
diskpartand press Enter. - Type
list diskand press Enter. Note your system disk number. - Type
select disk 0(replace 0 with your disk number) and press Enter. - Type
cleanand press Enter. - Type
convert gptand press Enter. - Type
exitand press Enter.
- Type
- Continue Installation: Close the command prompt and proceed with the Windows 11 installation. Select the unallocated space when prompted, and allow Windows Setup to create the partitions automatically.
Installation Media: Checking for Corruption
Faulty or improperly created installation media can also cause these errors.
- Recreate Installation Media: Use the official Media Creation Tool from Microsoft to download and create a fresh Windows 11 installation USB. Make sure the USB drive has at least 8GB of storage.
- Try a Different USB Drive: Sometimes, the USB drive itself is the problem. Use a different, known-good USB drive if possible.
- Third-Party Tools: If using tools like Rufus, ensure you choose the correct partition scheme (GPT for UEFI) and file system (FAT32 for UEFI boot).
- Retry Installation: Boot from your newly created USB and attempt the Windows 11 installation again.
Conclusion
Successfully navigating the “Windows could not update the computer’s boot configuration” error can feel daunting, but with these steps, you have the tools to troubleshoot and resolve the issue. Remember to back up important data before making any changes that might erase your disk. By carefully following these instructions, you should be able to get your system ready for the latest Windows 11 experience.
And if you'd like to go a step further in supporting us, you can treat us to a virtual coffee ☕️. Thank you for your support ❤️!

We do not support or promote any form of piracy, copyright infringement, or illegal use of software, video content, or digital resources.
Any mention of third-party sites, tools, or platforms is purely for informational purposes. It is the responsibility of each reader to comply with the laws in their country, as well as the terms of use of the services mentioned.
We strongly encourage the use of legal, open-source, or official solutions in a responsible manner.
Comments