
Microsoft’s Remote Desktop Protocol (RDP) has made Windows to Windows remote desktop connection a breeze as both the client and server are built into Windows operating systems.
Windows to Linux, or vice-versa, is slightly more complicated as you have to set up the Linux system as the client or server first. As our main goal is to access the Linux system remotely, we’ll primarily use RDP server implementations like xrdp or FreeRDP. SSH is a viable option as well for CLI login.
We’ve detailed the necessary steps to set up Remote Desktop from Windows to Linux with these methods, and more, in the sections below.
Prepare Linux System
First things first, you’ll need the IP Address of the Linux system you’re trying to access remotely. You can use the ip addr command for this. Once you have the IP, you can use your preferred method to set up Remote Desktop on Linux, after which you should skip ahead to Step 2.
GNOME Remote Desktop
Ubuntu supports desktop sharing by default thanks to GNOME Remote Desktop, which can operate through VNC (LibVNCServer) or RDP (FreeRDP). Setting up remote desktop with this method is extremely simple:
1- Open Settings and go to the Sharing tab.
2- Enable the Remote Desktop option.
3- GNOME Remote Desktop uses RDP by default, but you can enable Legacy VNC protocol if you want.

4- Also, note the device name, remote desktop address, user name, and password. These will be necessary later.
Xrdp
Xrdp is an implementation of RDP that supports graphical remoting. Additionally, it also has some useful features like two-way clipboard transfer and the ability to mount local drives on the client machine. Here’s how you can setup xrdp:
1- First, install the xrdp package with sudo apt install xrdp.
2- Permit xrdp to listen to connections (on port 3389 by default) with sudo ufw allow 3389.
3- Now, check the xrdp daemon status with systemctl status xrdp.service.
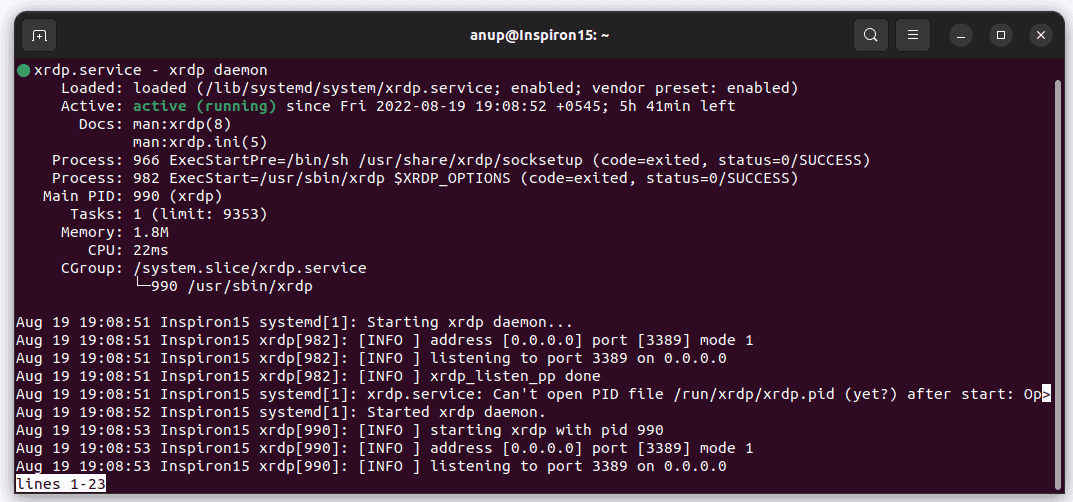
If the xrdp daemon is loaded and active (running), you’re good. You should log out of your account and skip ahead to Step 2 for steps for the Windows system.
But users often encounter various errors at this stage. In such cases, you’ll have to troubleshoot the issue and get xrdp running first.
- First, use the following commands to start, restart, then check xrdp’s status:
sudo systemctl start xrdp.service
sudo /etc/init.d/xrdp restart
systemctl status xrdp.service
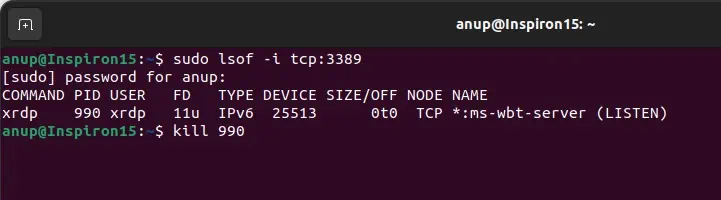
- Failed to start xrdp daemon, possibly address already in use is a common error.
To fix this, entersudo lsof -i tcp:3389and note the PID of the xrdp instance that’s already running. Usekill <PID>to end the process and try starting xrdp now.
- Login failed for Display 0.
First, make sure you’re entering the correct login credentials.
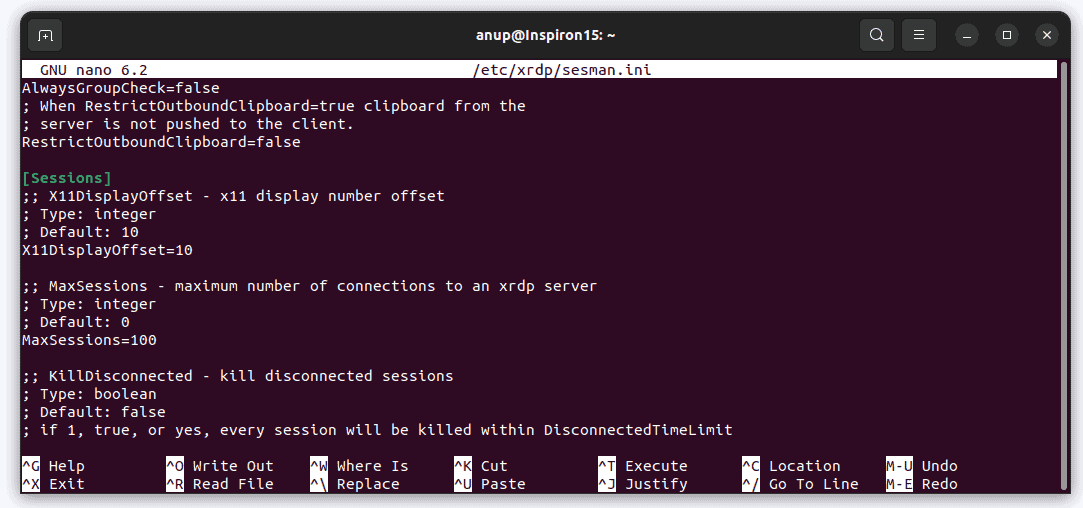
Once you’ve checked that, entersudo nano /etc/xrdp/sesmain.ini. The Max Sessions field should be 50 by default. Change the value to 100 and save the changes.
Repeat the same for/etc/xrdp/sesman.ini, restart the xrdp service, and check if you can connect now.
- If you encounter a black screen or internal error when trying to connect, make sure you’re logged out of the Linux system when trying to connect.
SSH
The previous two methods used RDP and VNC for graphical login. But if you’re fine with just CLI access, SSH is a great option. Setting up SSH is very simple; just use the following commands to install, enable, and allow it through the firewall:
sudo apt install sshsudo systemctl enable sshd --nowsudo ufw allow 22/tcp
Before moving on, it’s also worth mentioning that NoMachine is an excellent choice in terms of performance if you’re fine with non-open-source options.
Connect From Windows Machine
Both setting up and using Remote Desktop on the Windows machine is very simple. Here are the necessary steps for the RDP methods:
1- Press Win + R, type systempropertiesremote, and press Enter.
2- Enable the Remote Desktop and Remote Assitance features and press Ok.

3- Press Win + R, type mstsc, and press Enter.
4- Optional: Click on Show Options to modify additional settings such as display and audio.
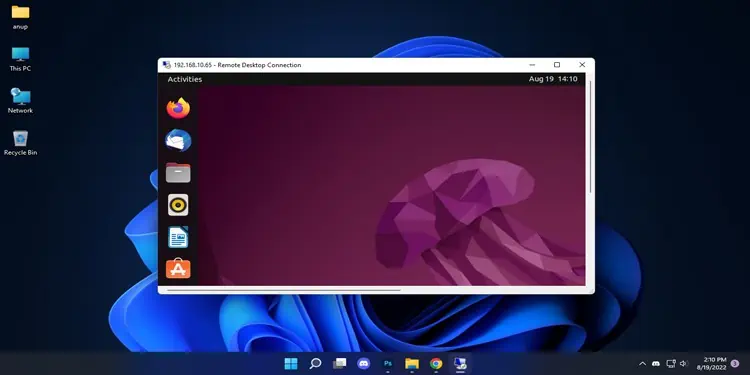
5- In the Computer field, enter the Linux system’s IP Address from Step 1 and press Connect.
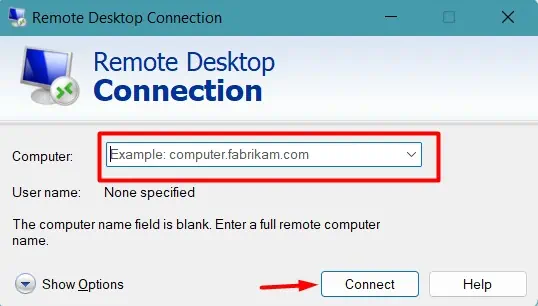
6- Enter the Linux system’s login credentials for authentication.
If you’re using SSH, simply enter ssh <user>@<ip> in a command prompt window and enter the password to authenticate and connect.

How to Setup Remote Desktop from Linux to Windows?
Setting up a remote desktop connection from Linux to Windows is even simpler. Ubuntu ships with the Remmina remote desktop client, which supports both RDP and VNC protocols. You can also manually install it with sudo apt install remmina remmina-plugin-vnc.
Here’s how you can set up Remote Desktop from Linux to Windows using Remmina:
1- Check the section above for steps to ensure Remote Desktop and Remote Assistance are enabled on Windows.
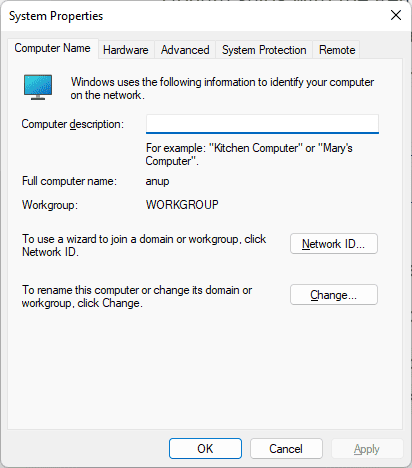
2- Use the ipconfig command and note the device’s IP.
3- Also, use the sysdm.cpl run command and note the Workgroup. By default, this will be WORKGROUP.
4- On Linux, launch the Remmina client.
5- Click on Add a new connection profile.

6- Enter the IP from Step 2 just above in the server field.
7- Fill in the username and password fields for authentication.
8- Fill in the workgroup from Step 3.
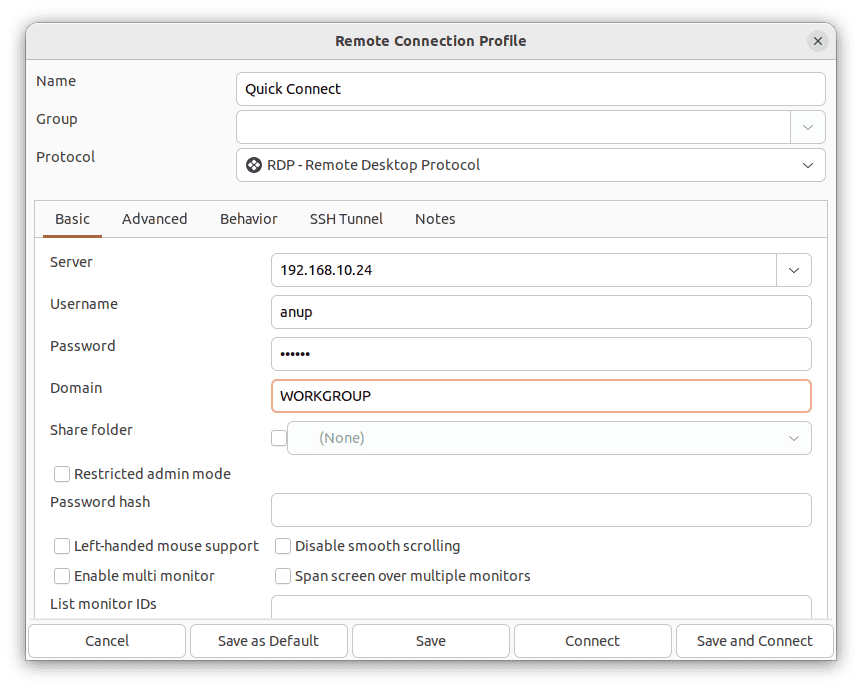
9- Press Connect, or Save and Connect as you prefer.
How to Setup Remote Desktop to Linux VM From Windows?
You can use the same steps that we’ve listed in this article to set up remote desktop from a Windows host to a Linux VM. The only difference is that you must ensure that the host and guest are on the same network. Here’s how you can do so:
1- First, check the Windows host’s network configurations with ipconfig.
2- Next, launch VMware or whichever hypervisor you’re using.
3- Right-click the Linux VM and select Settings.
4- In the Network Adapter section, set up a Bridged connection and press OK to save the changes.

5- Power on the VM and use ip a to check the IP address.
6- Assuming the first 3 parts of the address are the same as the Windows host, you should be able to set up the remote connection now.
End.
Did you like this article? Do not hesitate to share it on social networks and subscribe to Tech To Geek on Google News to not miss any articles!"Because of the Google update, I, like many other blogs, lost a lot of traffic."
Join the Newsletter
Please, subscribe to get our latest content by email.